I had multiple requests if CloudForms is able to provision containers via self service to the Red Hat OpenShift container platform. I liked the idea as you can not expect from every developer in your company to know how to create templates or build configs. I will walk you through, step by step how this can be achieved with CloudForms and it’s native integration into Ansible Tower.
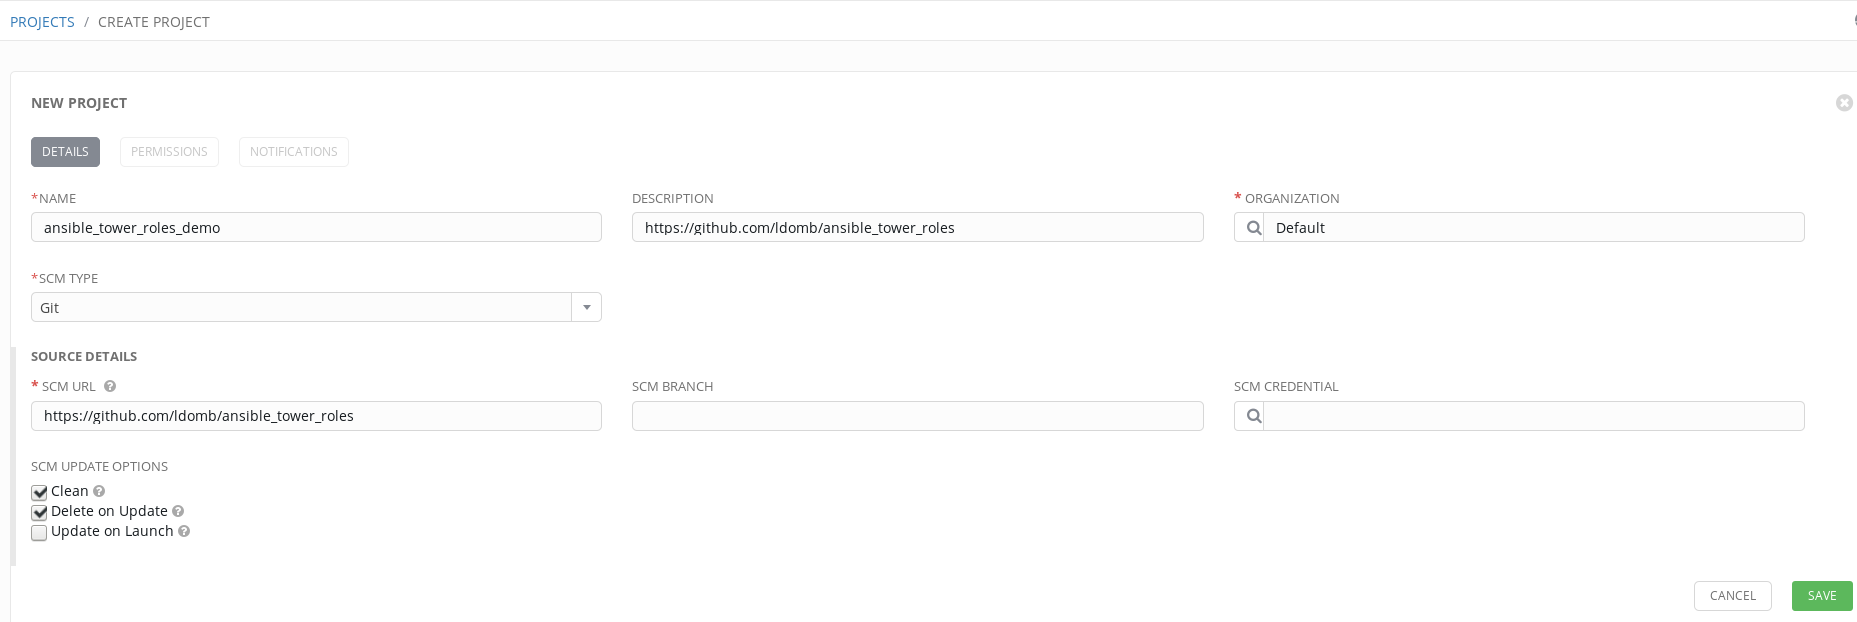
Step 1 Create a new project in Ansible Tower and add https://github.com/ldomb/ansible_tower_roles as the giturl this will download the role / playbook which I wrote to prove the above case.
Step 2 I assume that you already have an inventory added to your tower instance. Let’s create the Job Template so we can launch containers / pod in OpenShift. Add the following values to the job template
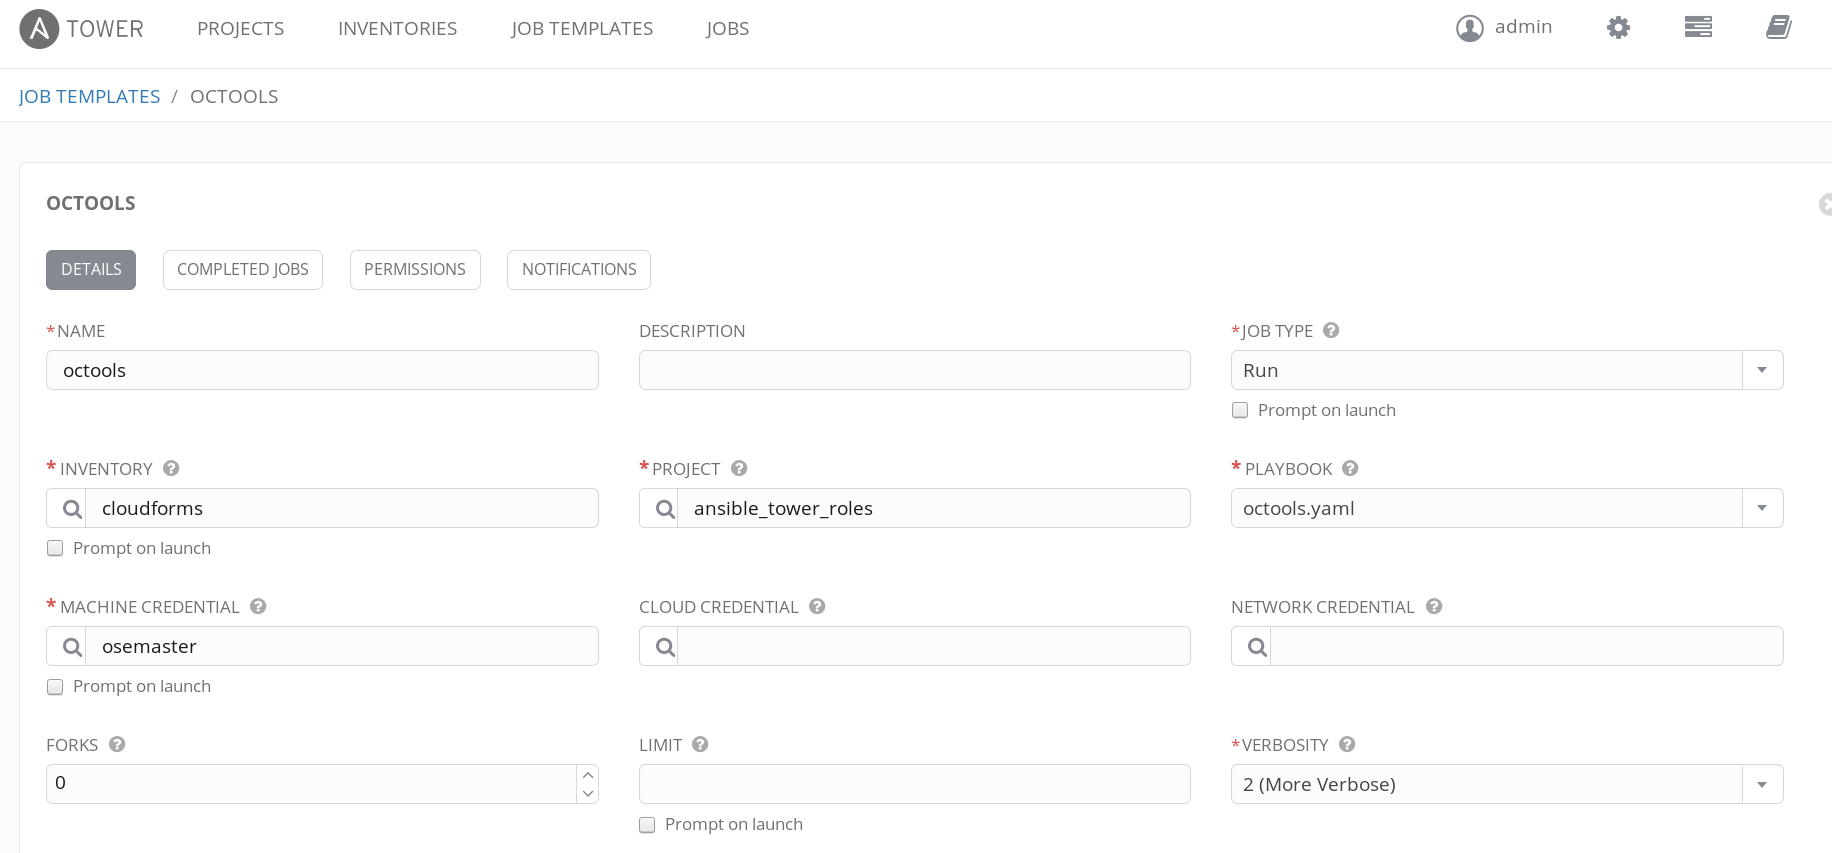
Step 3 For extra_vars add the following
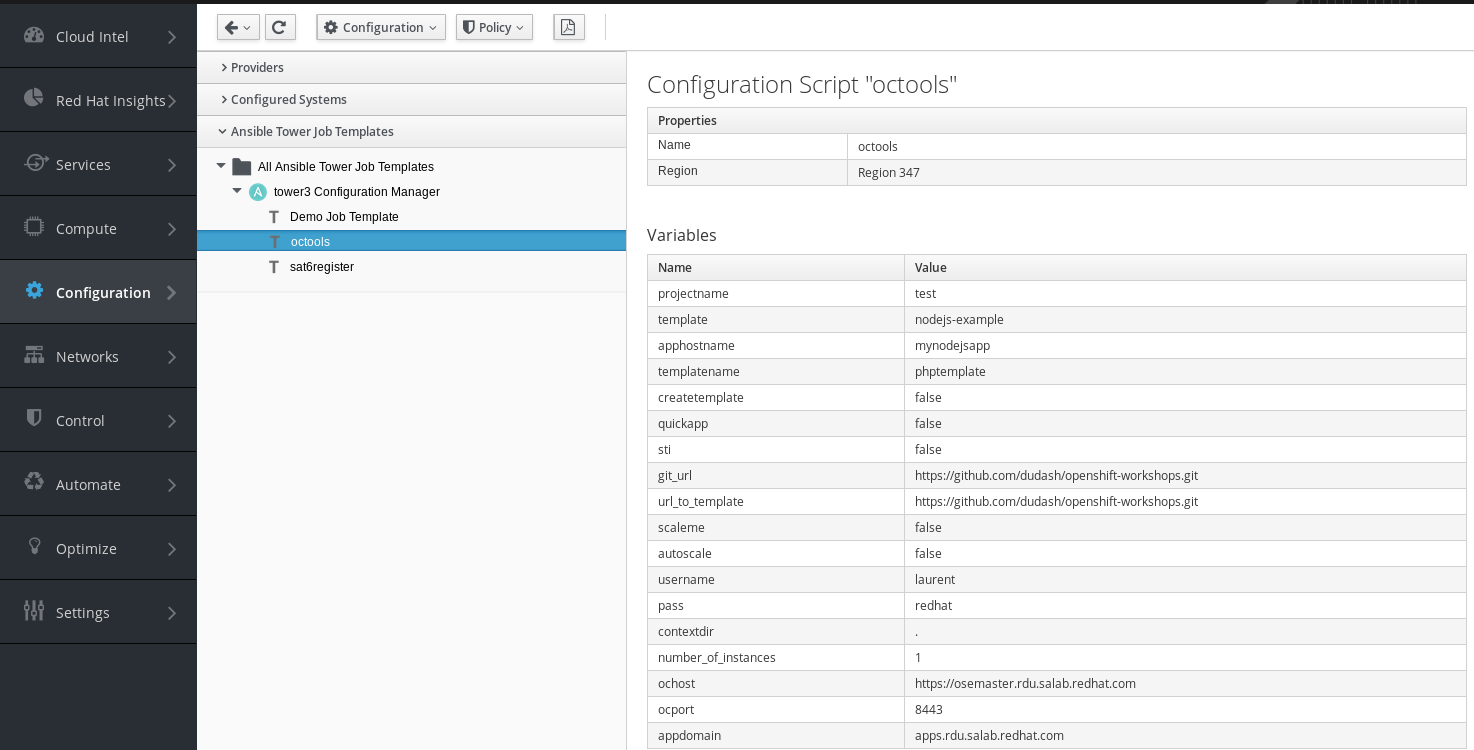
projectname: test
template: nodejs-example
apphostname: mynodejsapp
templatename: phptemplate
createtemplate: false
quickapp: false
sti: false
git_url: https://github.com/dudash/openshift-workshops.git
url_to_template: https://github.com/dudash/openshift-workshops.git
scaleme: false
autoscale: false
username: laurent
pass: redhat
contextdir: .
number_of_instances: 1
ochost: https://osemaster.rdu.salab.redhat.com
ocport: 8443
appdomain: apps.rdu.salab.redhat.com
Do not forget to check to box Prompt on launch and save tho job template
Step 4 Login to CloudForms and go to the tab configuration management -> Ansible Job Templates. You should see the following. Generate a catalog item from the octools template and name it ose_sti.
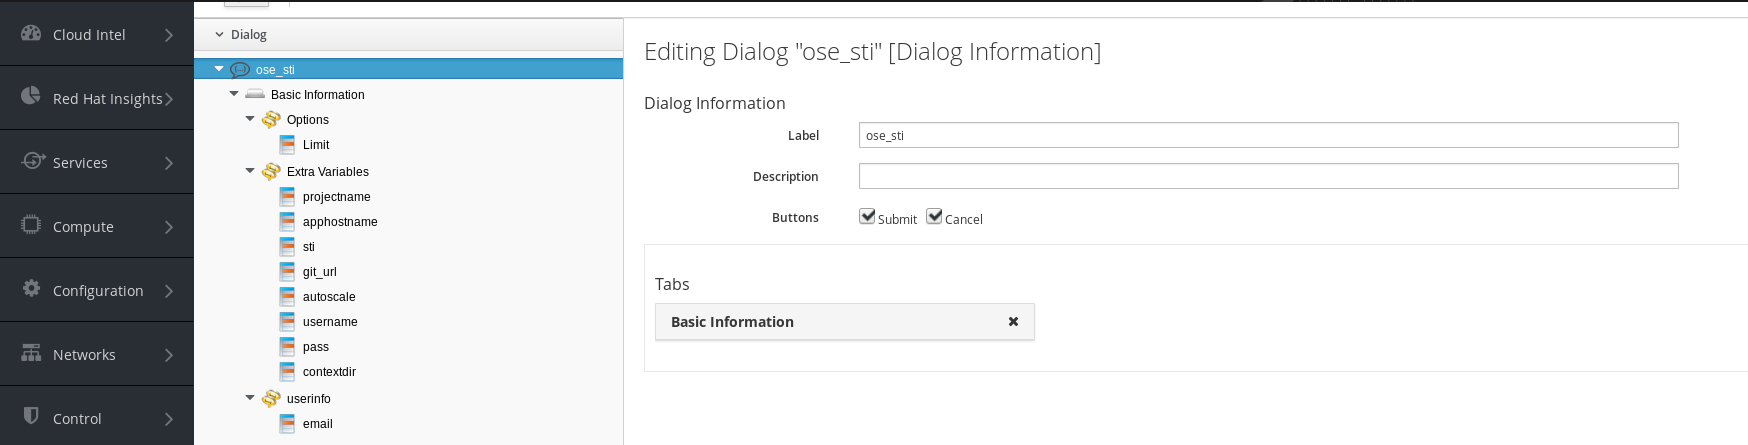
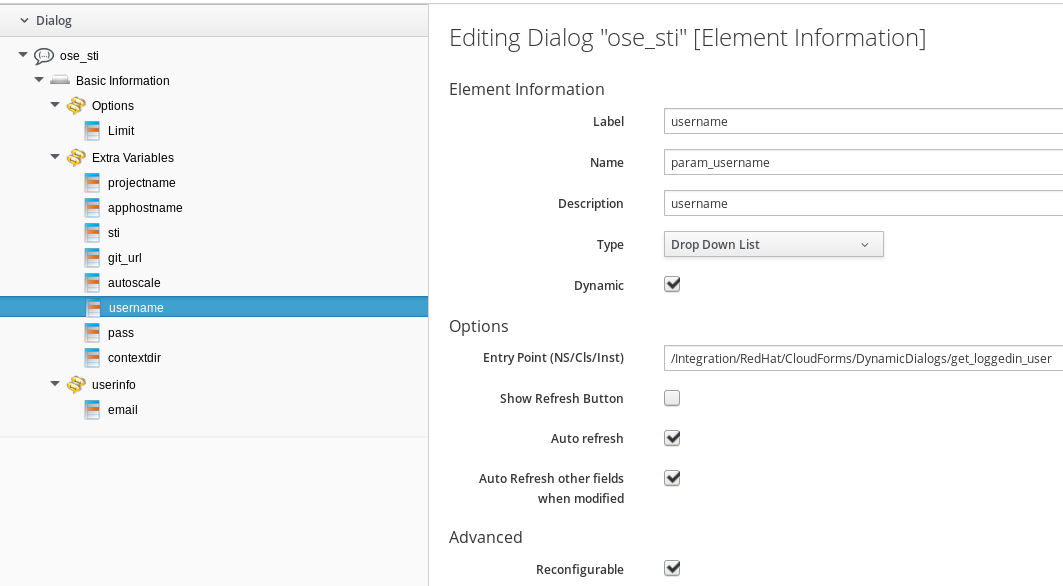
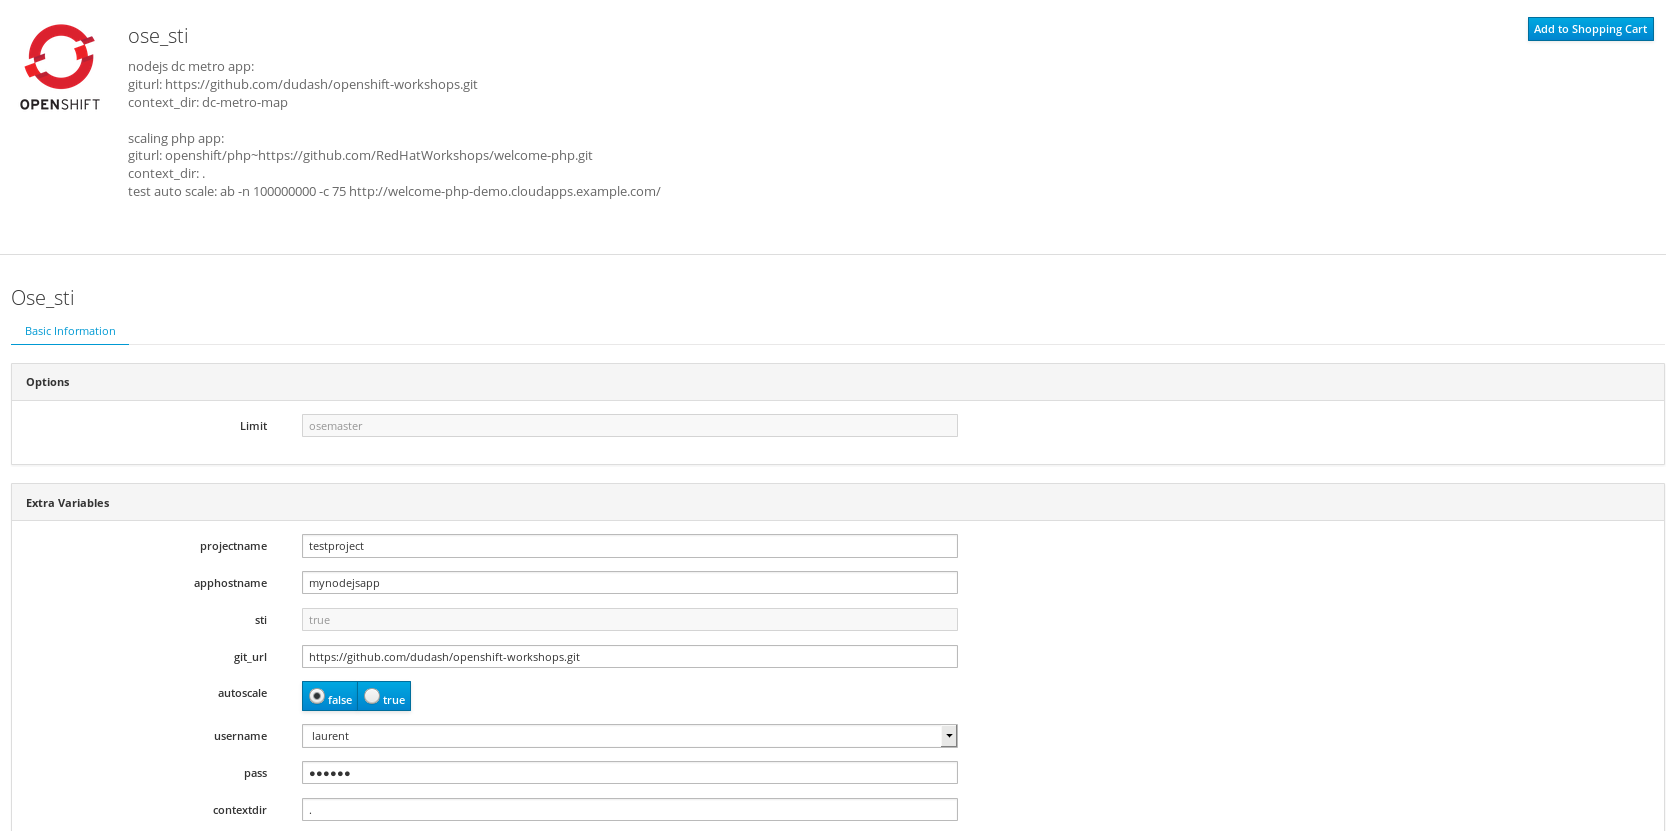
Step 5 Then go to Automate -> Customization -> Service Dialogs and click on the ose_sti catalog item. For this example we can delete some of the fields as they are not needed for source to image. Make sure your catalog item has the same fields as I am showing in the picture below.
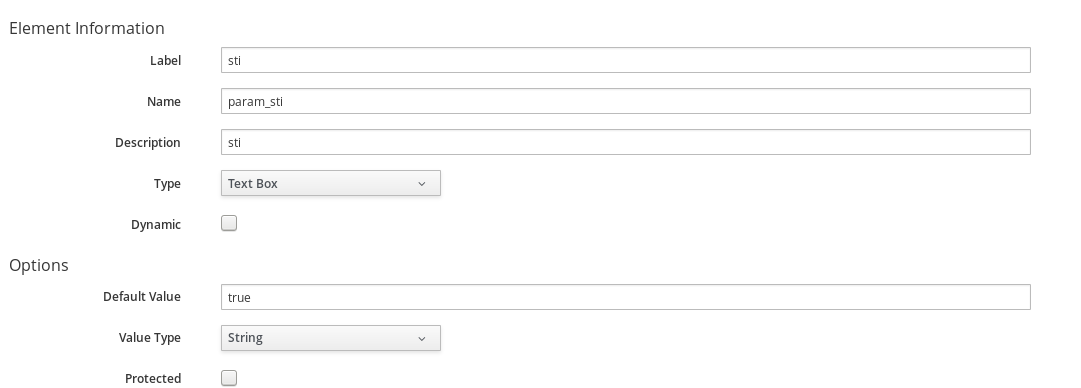
Step 6 Set the STI value to true as I am filtering for it in the ansible playbook. This field is read only.
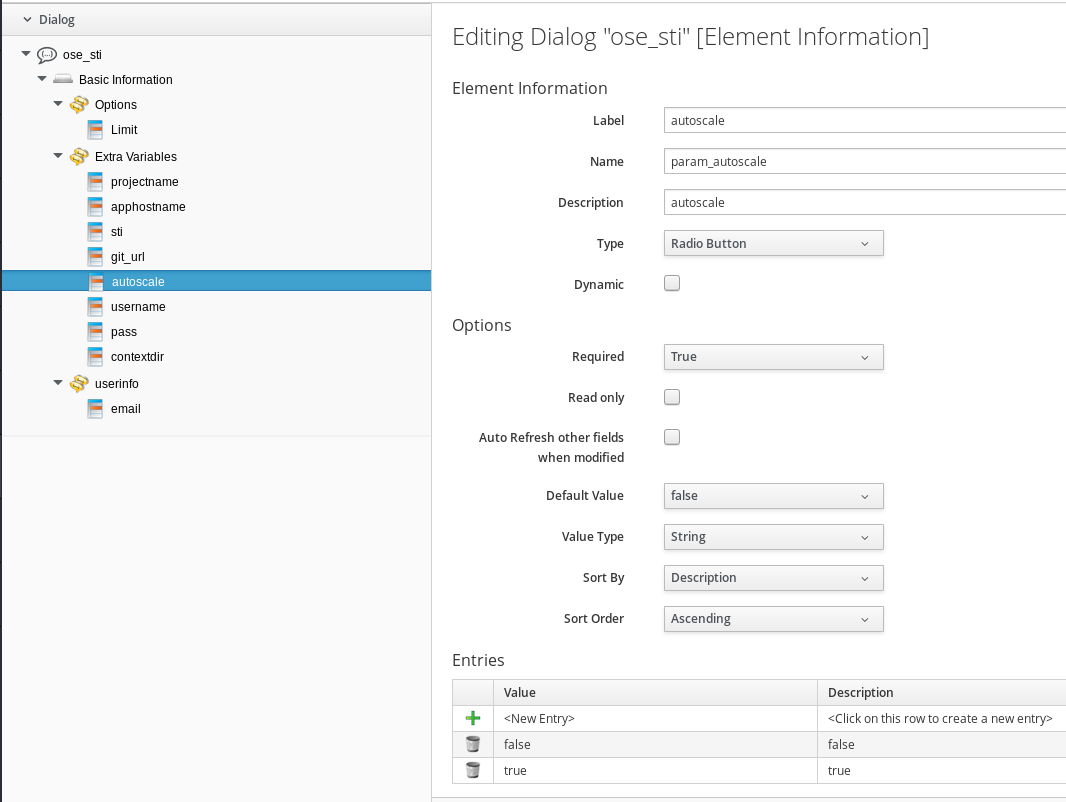
Step 7 For autoscale create a radio button with the values true or false. If you set it to true it will automatically create a horizontal pod autoscaler based on cpu load.
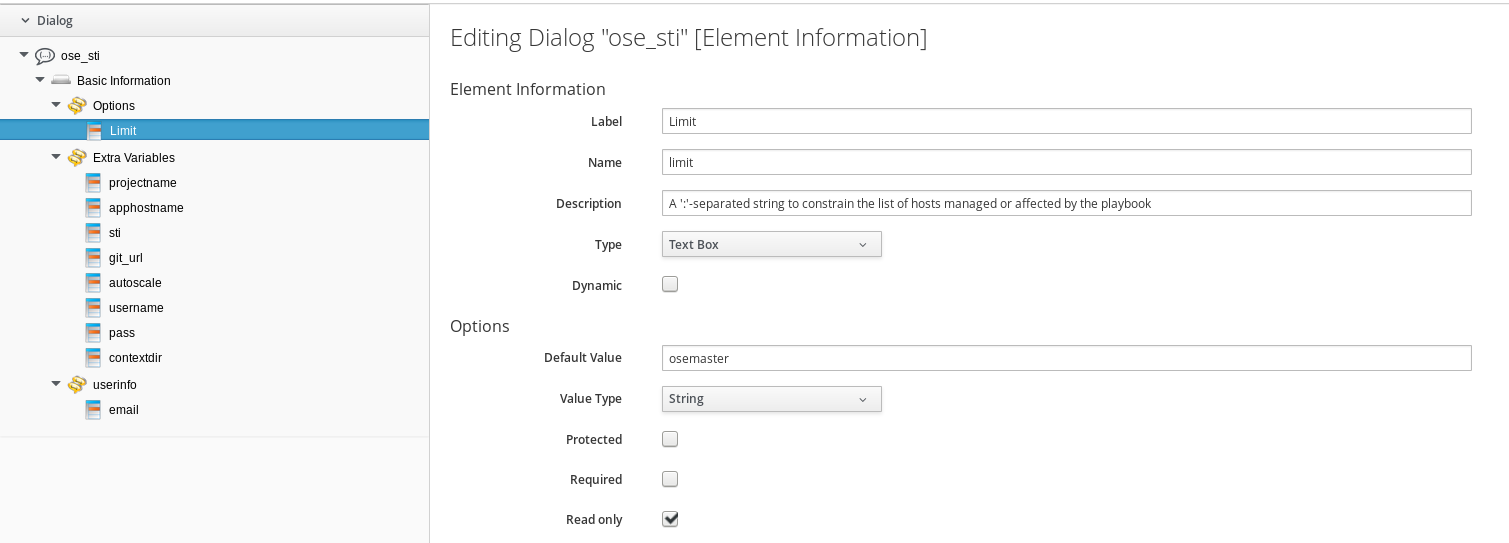
Step 8 The Limit for the job needs to be read only as well. I choose it to be the master as the master has the oc tools installed.
Step 9 For my OpenShift installation I am using basic auth. For this demo to work you need create a user in OpenShift matching the user loggedin in CloudForms.
Login to your openshift master and add a user to the htpasswd file
Remember the password.
Step 10 Go back to CloudForms. For the username field I’ve created a new method based on Kevin Moreys CloudForms Dropdown list https://github.com/ramrexx/CloudForms_Essentials in CloudForms_Essentials -> Integration -> RedHat -> CloudForms -> Dynamic dialog -> get_loggedin_user
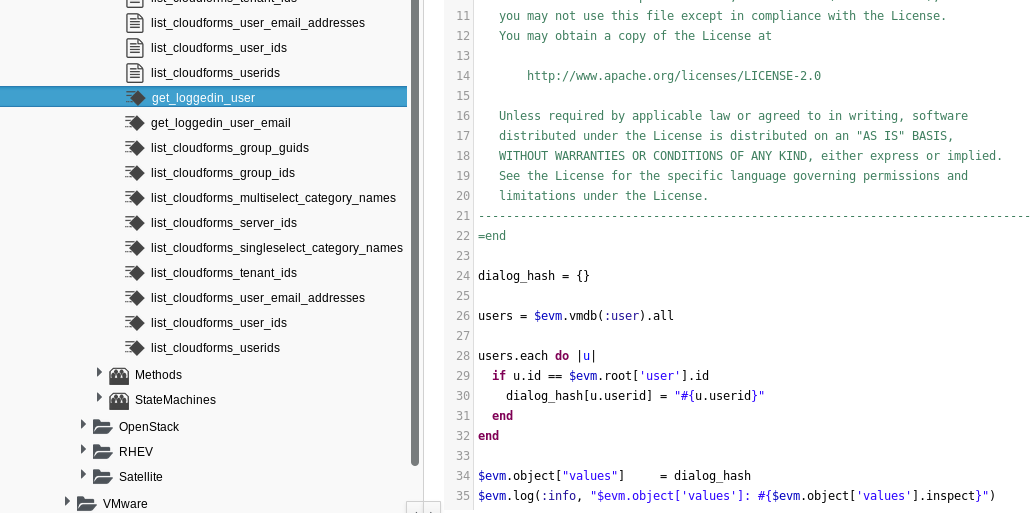
users = $evm.vmdb(:user).all
users.each do |u|
if u.id == $evm.root[‘user’].id
dialog_hash[u.userid] = “#{u.userid}”
end
end
$evm.object[“values”] = dialog_hash
$evm.log(:info, “$evm.object[‘values’]: #{$evm.object[‘values’].inspect}”)
Step 11 Wire the field to be a dynamic dropdown and add the following values.
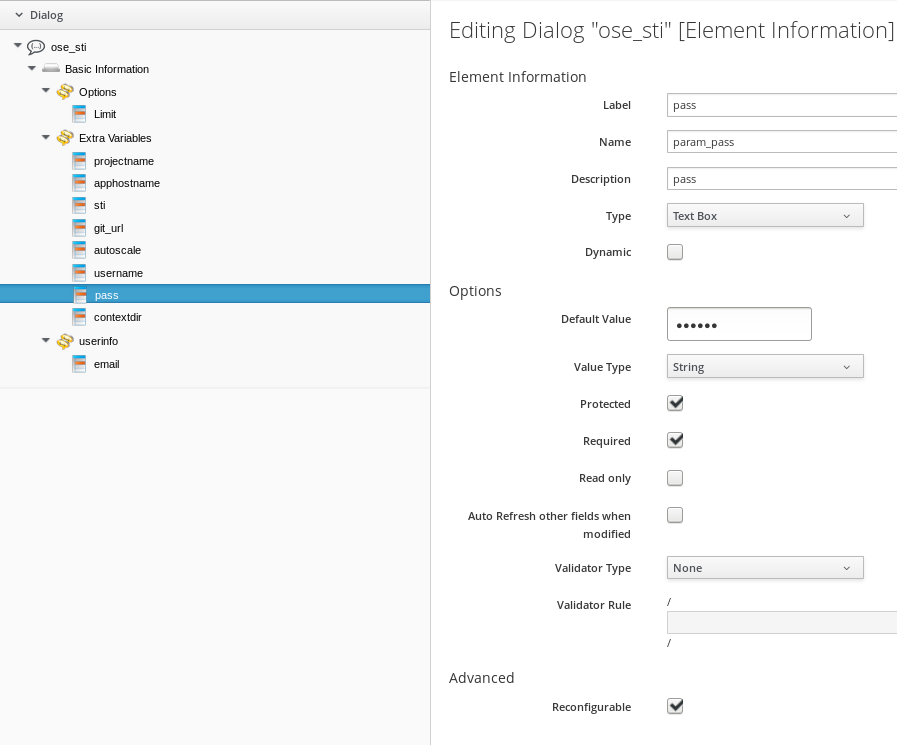
Step 12 The password field needs to be protected and match the one you’ve create with htpasswd on OpenShift. In reality you would have connected your CloudForms appliance and OpenShift to LDAP and grabbed the encrypted password from CloudForms instead of entering it.
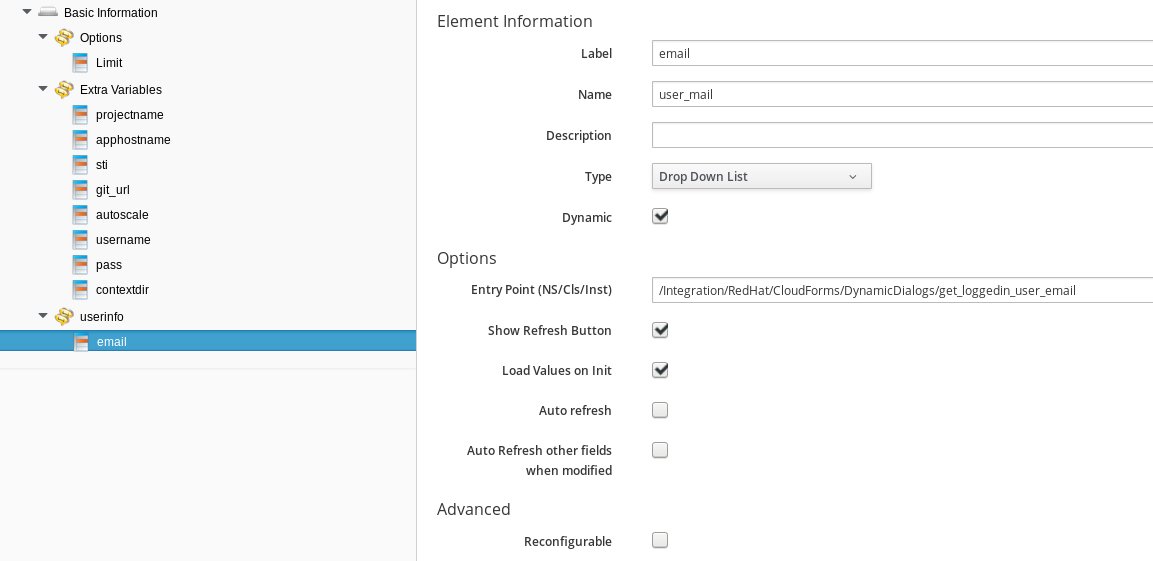
Step 13 For the email address I used another method in the CloudForms essentials domain as I want to send an email to the developer once his application is deployed. Create new method called get_loggedin_user_email
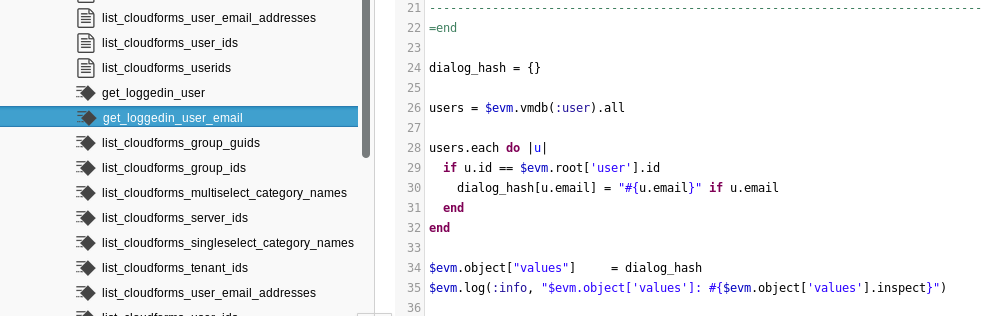
users = $evm.vmdb(:user).all
users.each do |u|
if u.id == $evm.root[‘user’].id
dialog_hash[u.email] = “#{u.email}” if u.email
end
end
$evm.object[“values”] = dialog_hash
$evm.log(:info, “$evm.object[‘values’]: #{$evm.object[‘values’].inspect}”)
The field email address should look like this

Step 14 To be able to send a user a customized email message I copied the ConfigurationManagement->AnsibleTower->Service->Provisioning->Email->ServiceProvision_Complete instance and its method ServiceProvision_Complete and renamed the method to ServiceProvision_Complete_OSE. Your instance should look like this.

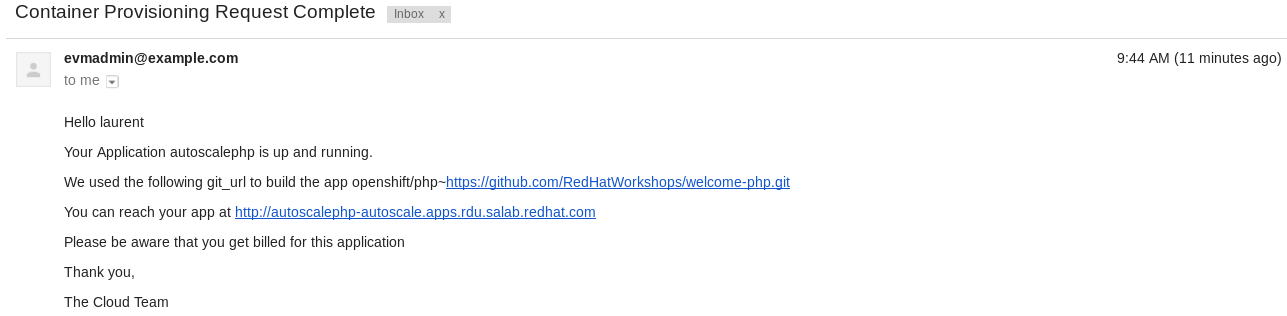
Step 15 Create the email method ServiceProvision_Complete_OSE and add the following content
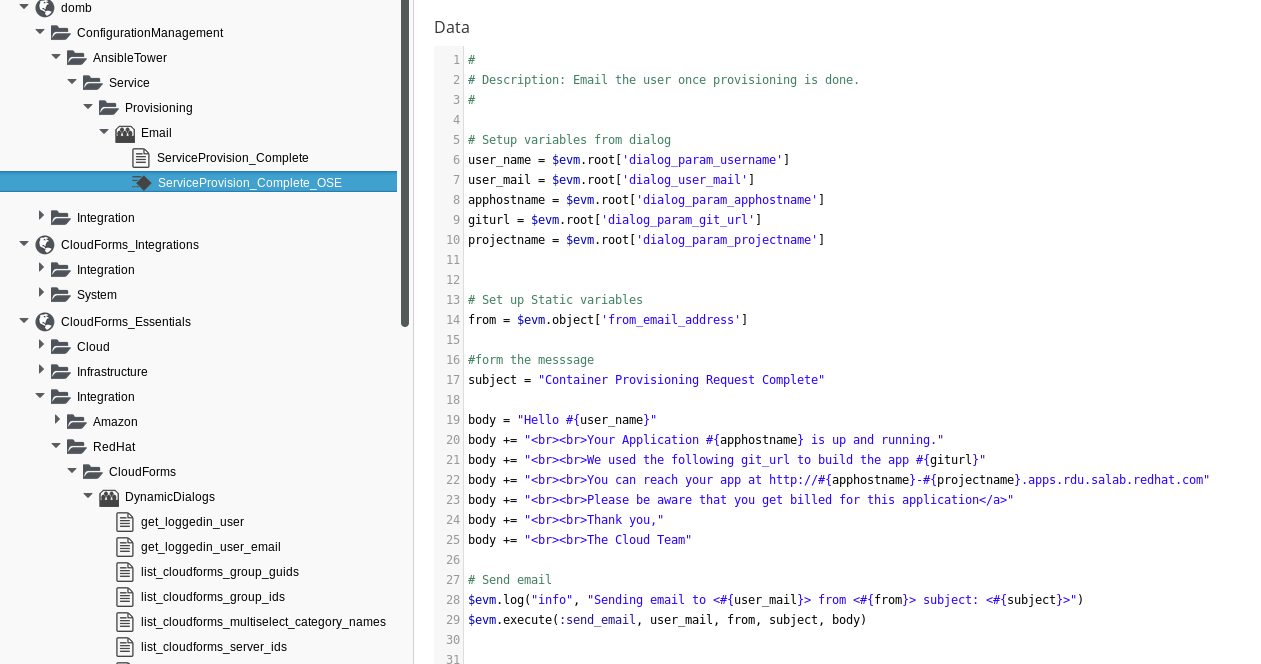
# Description: Email the user once provisioning is done.
#
# Setup variables from dialog
user_name = $evm.root[‘dialog_param_username’]
user_mail = $evm.root[‘dialog_user_mail’]
apphostname = $evm.root[‘dialog_param_apphostname’]
giturl = $evm.root[‘dialog_param_git_url’]
projectname = $evm.root[‘dialog_param_projectname’]
# Set up Static variables
from = $evm.object[‘from_email_address’]
#form the messsage
subject = “Container Provisioning Request Complete”
body = “Hello #{user_name}”
body += ”
Your Application #{apphostname} is up and running.”
body += ”
We used the following git_url to build the app #{giturl}”
body += ”
You can reach your app at http://#{apphostname}-#{projectname}.apps.yourdomain.com
body += ”
Go back to work!
body += ”
Please be aware that you get billed for this application”
body += ”
Thank you,”
body += ”
The Cloud Team”
# Send email
$evm.log(“info”, “Sending email to from subject: “)
$evm.execute(:send_email, user_mail, from, subject, body)
Step 16 Wire up your email field and we are done with configuring the catalog item
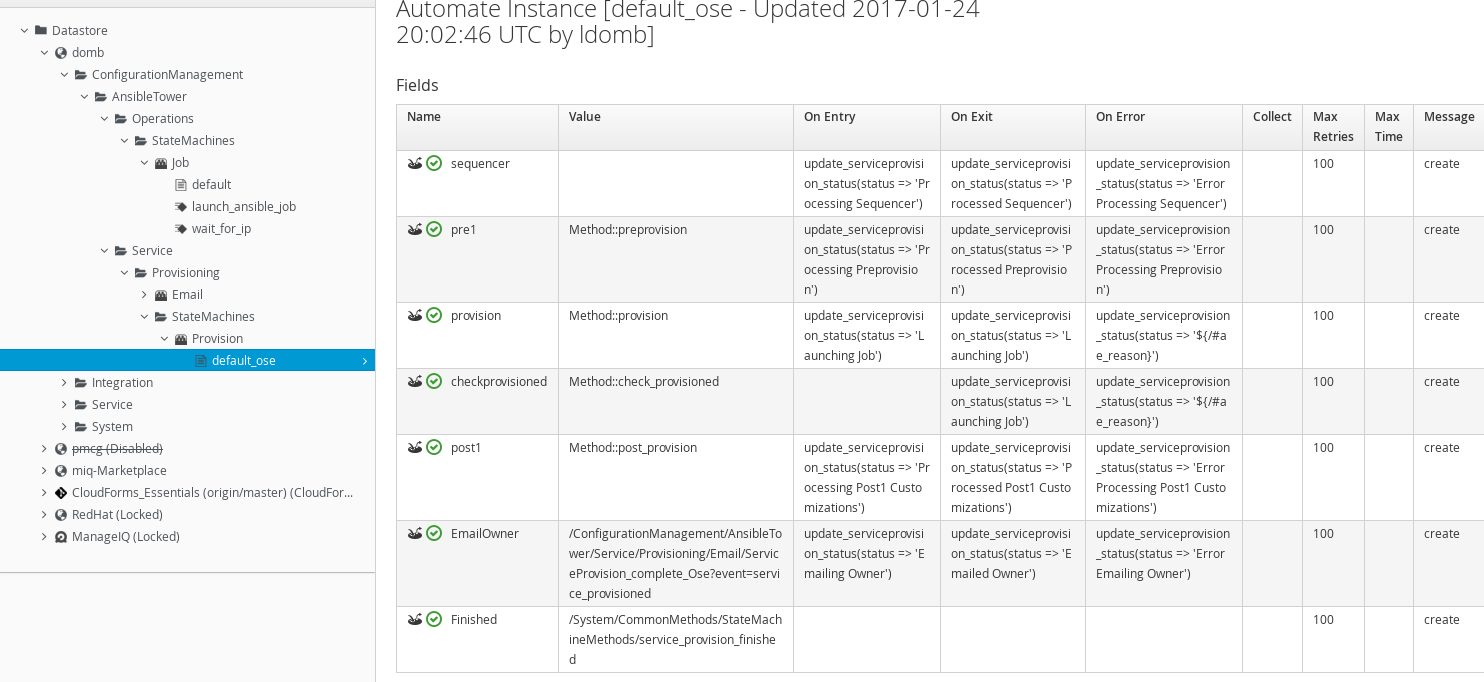
Step 17 Create a new StateMachine named default_ose for Email Owner add
/ConfigurationManagement/AnsibleTower/Service/Provisioning/Email/ServiceProvision_complete_Ose?event=service_provisioned
This will send off the email once you deployed the container
Step 18 Login to your cloudforms self service portal https:///self_service and click on the ose_sti tile which will lead you to the catalog item.
Fill out the fields in the catalog item, add it to the shopping cart and order it.
You can know check the Ansible Tower and see that your job got kicked off

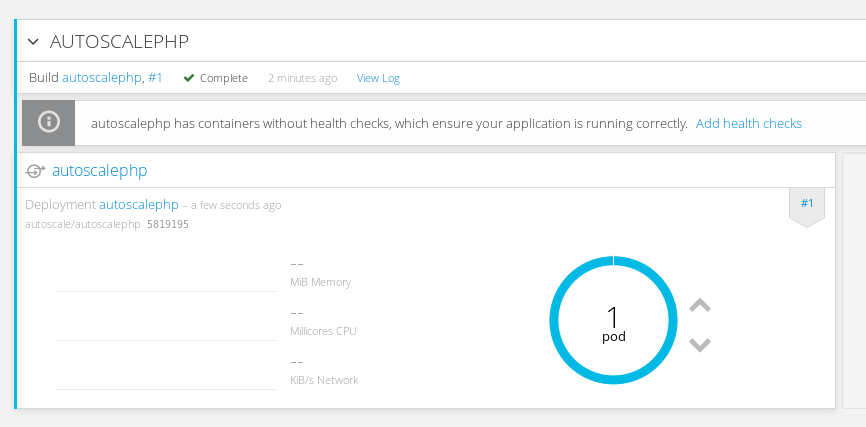
Step 19 After a few seconds you will see that OpenShift starts up the pods with your container in it.

Step 20 If your pod started successfully you should see this
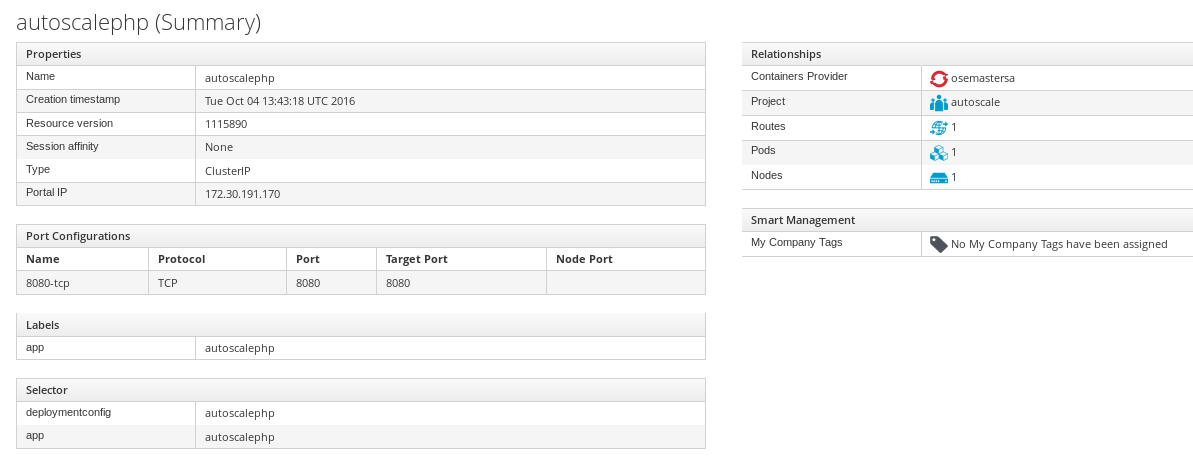
Step 21 Go back to CloudForms and verify that you also see the newly created pod.

and its services
Step 22 In the meantime you also should have received an email saying that the container provisioning was complete.