
OCP 4.0 is not out yet but you have the chance to get your hands dirty by going to the following URL https://try.openshift.com. Log in with your redhat account and you should be good to go.
You will notice that we are using a new installer called openshift-installer. The installer uses terraform to build the infrastructure in AWS. It creates VPC, Subnets, Security Groups, NatGW, Route53 as well as many other components for you.
When launching the installer for OCP 4.0 (openshift-installer create cluster) you will get prompted for the SSH key, Platform to install, the region, Base Domain as well as the Cluster name and pull secret. Once you enter all the information and press “enter” you can expect a fully highly available OpenShift environment in AWS. If the installer finishes successfully you will see the following output.
[cc lang=”bash”]
? SSH Public Key /Users/ldo/.ssh/id_rsa.pub
? Platform aws
? Region us-east-1
? Base Domain ocp.redhat-demo.com
? Cluster Name ldo
? Pull Secret [? for help] ********************************************************************************************************************************************************************************************************************************************************************************************************************************************INFO Creating cluster…
INFO Waiting up to 30m0s for the Kubernetes API…
INFO API v1.11.0+b14b11d up
INFO Waiting up to 30m0s for the bootstrap-complete event…
INFO Destroying the bootstrap resources…
INFO Waiting up to 10m0s for the openshift-console route to be created…
INFO Install complete!
INFO Run ‘export KUBECONFIG=/Users/dobby/go/src/github.com/openshift/installer/bin/auth/kubeconfig’ to manage the cluster with ‘oc’, the OpenShift CLI.
INFO The cluster is ready when ‘oc login -u kubeadmin -p jcdfT-CDUuQ-3KcK4-C8YaP’ succeeds (wait a few minutes).
INFO Access the OpenShift web-console here: https://console-openshift-console.apps.ldo.ocp.redhat-demo.com
INFO Login to the console with user: kubeadmin, password: jcdfT-CDUuQ-3KcK4-C8YaP
[/cc]
You can now either access your cluster via “oc” command by running the following two commands:
[cc lang=”bash”]
ldo:$ export KUBECONFIG=/Users/dobby/go/src/github.com/openshift/installer/bin/auth/kubeconfig
ldo:$ oc login -u kubeadmin -p jcdfT-CDUuQ-3KcK4-C8YaP
[/cc]
or login into the new ocp console via browser. Remember that your login is kubeadmin.
https://console-openshift-console.apps.ldo.ocp.redhat-demo.com
Now that you have a fully functional and highly available OpenShift environment you are probably wondering, what did the install create. If you just installed a cluster with openshift-installer create cluster it created the following architecture:
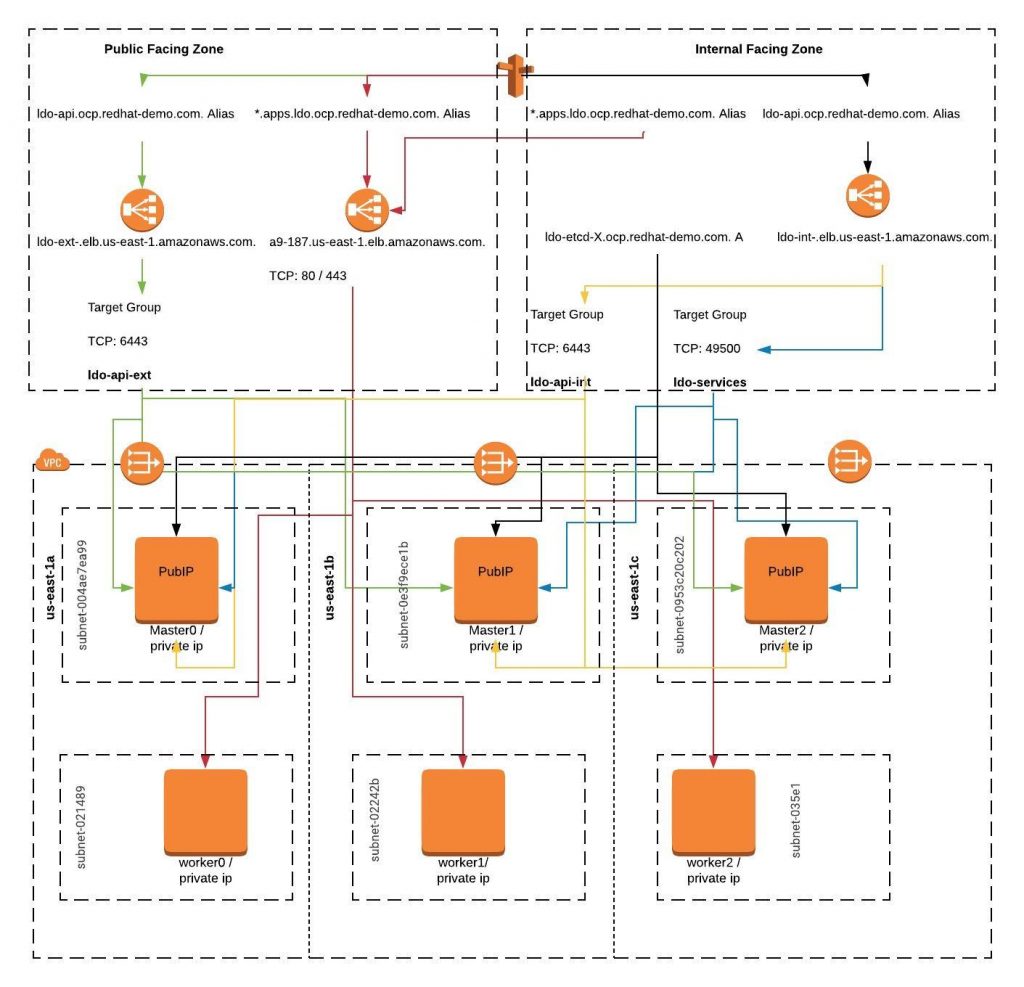
As you can see the installer added some entries to the Public facing zone as well as created a new internal facing zone. The internal facing zone will be fully managed by terraform. So if you destroy your cluster the internal zone will be gone. This count’s for all the components described in the architecture above which were created by the installer.
To note as well, if you are interested in exploring what’s going on during the installation by SSH’ing into the bootstrap or master nodes, you will need to use “core” as the user.