As you might know Red Hat released a new version of the OpenStack (Kilo) installer based on tripleO and Ironic. One of the reason why Red Hat went with tripleO and ironic is that you will be able to extend and upgrade an existing OSP 7 environment. Part 1 of the blog series is about setting up OSP director.
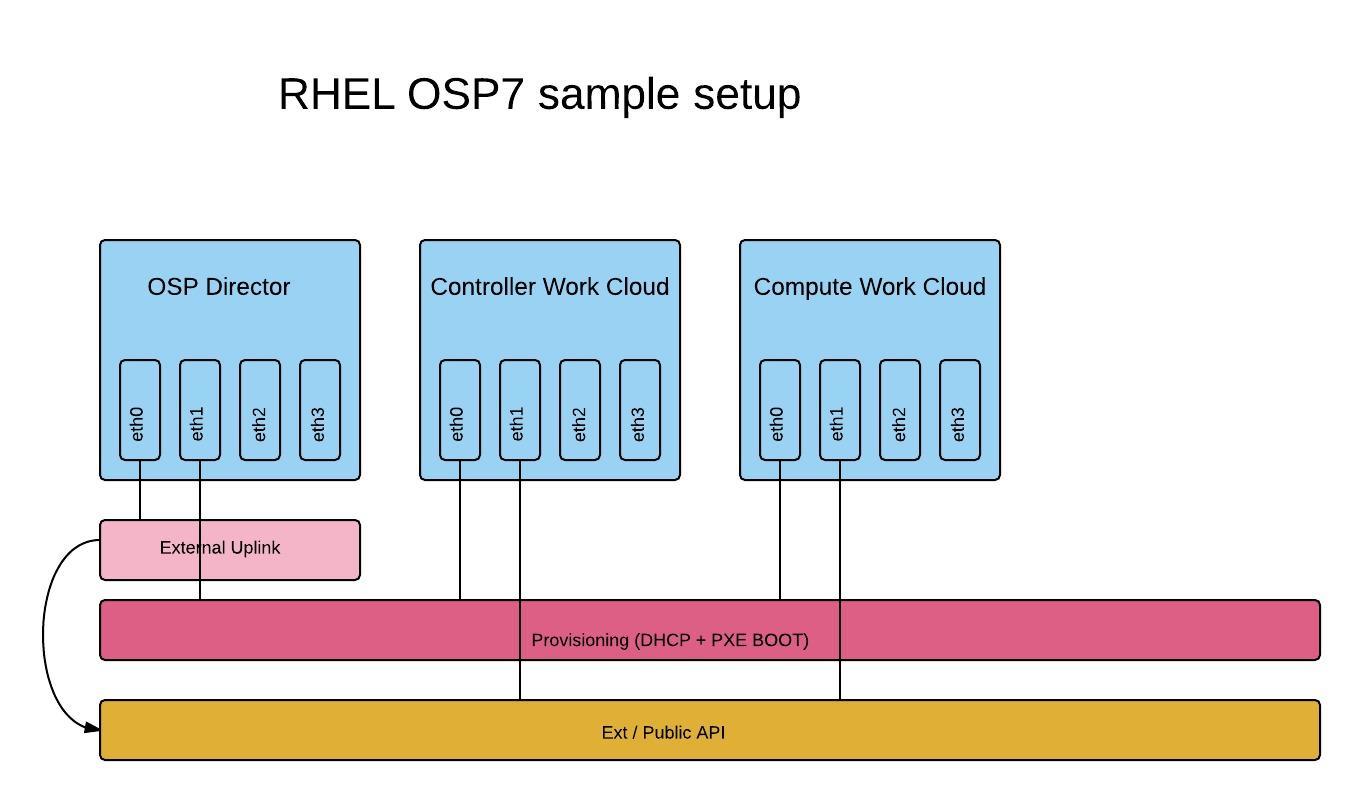
First we need to install the OSP director node. In my case I am going to have to following base setup:
If you are lazy and want it up and running without much typing, here is an install script:
OSP director install script
1. First we need to create the stack user and allow stack to execute commands as root
[root@ospdirector ~]# useradd stack
[root@ospdirector ~]# echo redhat | passwd stack --stdin
[root@ospdirector ~]# echo "stack ALL=(root) NOPASSWD:ALL" | tee -a /etc/sudoers.d/stack
[root@ospdirector ~]# chmod 0440 /etc/sudoers.d/stack
2. Setup the Hostname in /etc/hosts
127.0.0.1   localhost localhost.localdomain localhost4 localhost4.localdomain4
::1         localhost localhost.localdomain localhost6 localhost6.localdomain6
192.168.1.34 ospdirector.local.domb.com ospdirector
3. Set the hostname on the command line
[root@ospdirector ~]# hostnamectl set-hostname ospdirector.local.domb.com
[root@ospdirector ~]# hostnamectl set-hostname --transient  ospdirector.local.domb.com
4. Enable ip forwarding
[root@ospdirector ~]# echo "net.ipv4.ip_forward = 1" > /etc/sysctl.d/99-ipforward.conf
[root@ospdirector ~]# sysctl -p /etc/sysctl.d/99-ipforward.conf
5. Subscribe to the right channels
[root@ospdirector ~]# subscription-manager register -u $RHNUSER -p $RHNPASSWORD
[root@ospdirector ~]# subscription-manager attach --pool=$POOLID
[root@ospdirector ~]# subscription-manager repos --disable='*'
[root@ospdirector ~]# subscription-manager repos --enable=rhel-7-server-rpms --enable=rhel-7-server-optional-rpms --enable=rhel-7-server-extras-rpms --enable=rhel-7-server-openstack-7.0-rpms --enable=rhel-7-server-openstack-7.0-director-rpms
6. Update your system and reboot
[root@ospdirector ~]# yum update -y
[root@ospdirector ~]# reboot
7. Create the instack-certs dir
[root@ospdirector ~]# mkdir -p /etc/pki/instack-certs
8. Create the directories /home/stack/images and /home/stack/templates
[root@ospdirector ~]# mkdir -p /home/stack/{images,templates}
[root@ospdirector ~]# chown -R stack.stack /home/stack
9. ALL next steps need to be done as user stack install the python-rdomanager-oscplugin.
[stack@ospdirector ~]$ sudo yum install -y python-rdomanager-oscplugin
10. Copy the undercloud.conf into the stacks home dir
[stack@ospdirector ~]$ cp /usr/share/instack-undercloud/undercloud.conf.sample ~/undercloud.conf
11. Create the SSL keys for the undercloud
[stack@ospdirector ~]$ openssl genrsa -out privkey.pem 2048
[stack@ospdirector ~]$ openssl req -new -x509 -key privkey.pem -out cacert.pem -days 365
[stack@ospdirector ~]$ cat cacert.pem privkey.pem > undercloud.pem
12. As root perform the following steps
[root@ospdirector ~]# cp /home/stack/undercloud.pem /etc/pki/instack-certs/
[root@ospdirector ~]# semanage fcontext -a -t haproxy_exec_t /etc/pki/instack-certs(/.*)?
[root@ospdirector ~]# restorecon -R /etc/pki/instack-certs
13. Now that we have done all the pre work we can now proceed with editing the /home/stack/underlcoud.conf. Make sure to change the following lines within the undercloud.conf as user stack.
image_path = /home/stack/images
local_ip = 192.168.2.2/24
undercloud_public_vip = 192.168.2.3
undercloud_admin_vip = 192.168.2.4
local_interface = enp2s4
masquerade_network = 192.168.2.0/24
dhcp_start = 192.168.2.5
dhcp_end = 192.168.2.24
network_cidr = 192.168.2.0/24
network_gateway = 192.168.2.2
discovery_interface = br-ctlplane
discovery_iprange = 192.168.2.100,192.168.2.120
discovery_runbench = true
undercloud_debug = true
14. Leave everything as it is in the auth section for now.
15. As user stack launch the install. Once your done you only will be able to access the actual undercloud via pxe network. If you want to make this accessable for anywhere you need to edit the /etc/openstack-dashboard/local_settings.
[stack@ospdirector ~]$ openstack undercloud install
And you might want to change the allowed_hosts param in local_settings to
ALLOWED_HOSTS = ['*', ]
16. You should know be able to login to your horizon dashboard. To get the admin password run
[root@ospdirector ~]# hiera admin_password
a98986363712b2d2cd41d8921778f4a748285934
17. Next we will have to download the following images from https://access.redhat.com/downloads/content/191/ver=7.0/rhel—7/7.0/x86_64/product-downloads
– Deployment Ramdisk for RHEL-OSP director 7.0
– Discovery Ramdisk for RHEL-OSP director 7.0
– Overcloud Image for RHEL-OSP director 7.0
[stack@ospdirector ~]$ cd ~/images
[stack@ospdirector ~]$ wget "https://access.cdn.redhat.com//content/origin/files/sha256/dd/ddc2e62c974f3936692c337ff0df345ae43c6875748a60ca2a95e17473bb45e9/deploy-ramdisk-ironic-7.0.0-32.tar?_auth_=1439746122_20b2932d1dc966089c44c54f865ce610" -O deploy-ramdisk-ironic-7.0.0-32.tar
[stack@ospdirector ~]$ tar -xvf deploy-ramdisk-ironic-7.0.0-32.tar
[stack@ospdirector ~]$ wget "https://access.cdn.redhat.com//content/origin/files/sha256/d1/d1ddf17d68c36d8dd6ff4083018bd530a79baa29008db8cd4eb19a09e038d0df/discovery-ramdisk-7.0.0-32.tar?_auth_=1439746122_65fa925b5cbf58fa47cb7e484bcf4a13" -O discovery-ramdisk-7.0.0-32.tar
[stack@ospdirector ~]$ tar -xvf discovery-ramdisk-7.0.0-32.tar
[stack@ospdirector ~]$ wget "https://access.cdn.redhat.com//content/origin/files/sha256/33/33c08823e459f19df49b8a997637df6029337113fd717e4bc9119965c40dee94/overcloud-full-7.0.0-32.tar?_auth_=1439746122_5ee941acb994a6ff04b7717d43453dc0" -O overcloud-full-7.0.0-32.tar
[stack@ospdirector ~]$ tar -xvf overcloud-full-7.0.0-32.tar
18. Upload the images to glance in the undercloud and check if the images are there
[stack@ospdirector ~]$ source ~/stackrc
[stack@ospdirector ~]$ openstack overcloud image upload
[stack@ospdirector ~]$ openstack image list
+--------------------------------------+------------------------+
| ID                                   | Name                   |
+--------------------------------------+------------------------+
| 11a4d0a3-7c00-42d2-ba86-8f75317aea10 | bm-deploy-ramdisk      |
| 15f8a2f3-0da9-482e-95c9-72e548871b3f | bm-deploy-kernel       |
| 5ad61c3e-9ea6-461e-bcba-dfa93c7113f4 | overcloud-full         |
| 39a6a2d6-0e2e-4105-8d30-340439e0fd63 | overcloud-full-initrd  |
| 5b9c986d-4465-48a6-a14f-7105c1c4e2d3 | overcloud-full-vmlinuz |
+--------------------------------------+------------------------+
19. Set the nameserver for the overcloud
[stack@ospdirector ~]$ neutron subnet-list
+--------------------------------------+------+----------------+-------------------------------------------------+
| id                                   | name | cidr           | allocation_pools                                |
+--------------------------------------+------+----------------+-------------------------------------------------+
| 5f28722a-96b4-4f27-b616-248cbfe5a432 |      | 192.168.2.0/24 | {"start": "192.168.2.5", "end": "192.168.2.24"} |
+--------------------------------------+------+----------------+-------------------------------------------------+

[stack@ospdirector ~]$ neutron subnet-update 5f28722a-96b4-4f27-b616-248cbfe5a432  --dns-nameserver 8.8.8.8
Your OSP Director setup is now complete. The next part will explain how you will be able to discover your hosts, setup flavors and deploy the test cloud.