
In the last few month I got quite a few requests on deploying RHV as a single hyper-converged non extendable node with local storage (not gluster). This blog post is going to show you how you can install RHVM on baremetal and add the same host which hosts the baremetal engine to RHVM. As always, you need a working dns server and the engine host needs to resolve (forward and reverse lookups). for this to work.
Step1. Register your host with subscription manager
[root@engine1 ~]# subscription-manager register
[root@engine1 ~]# subscription-manager attach --pool YourPool
Step2. Attach the needed channels
[root@engine1 ~]# subscription-manager repos --disable=*
[root@engine1 ~]# subscription-manager repos --enable=rhel-7-server-rpms \
--enable=rhel-7-server-supplementary-rpms \
--enable=rhel-7-server-rhv-4.1-rpms \
--enable=rhel-7-server-rhv-4-tools-rpms \
--enable=jb-eap-7-for-rhel-7-server-rpms \
--enable=rhel-7-server-rhv-4-mgmt-agent-rpms
Step3. Update the host and reboot
[root@engine1 ~]# yum -y update && init 6
Step4. Disable firewalld as the hypervisor will use iptables when it adds the hosts.
[root@engine1 ~]# systemctl disable firewalld && systemctl stop firewalld
Step 5. Install rhvem
[root@engine1 ~]# yum -y install rhevm iptables-services
Step 6. Set iptables rules. Open /etc/sysconfig/iptables and drop in the following
# oVirt default firewall configuration. Automatically generated by vdsm bootstrap script.
*filter
:INPUT ACCEPT [0:0]
:FORWARD ACCEPT [0:0]
:OUTPUT ACCEPT [0:0]
-A INPUT -m state --state ESTABLISHED,RELATED -j ACCEPT
-A INPUT -p icmp -j ACCEPT
-A INPUT -i lo -j ACCEPT
# vdsm
-A INPUT -p tcp --dport 54321 -j ACCEPT
# ovirt-imageio-daemon
-A INPUT -p tcp --dport 54322 -j ACCEPT
-A INPUT -p tcp --dport 5432 -j ACCEPT
# rpc.statd
-A INPUT -p tcp --dport 111 -j ACCEPT
-A INPUT -p udp --dport 111 -j ACCEPT
# SSH
-A INPUT -p tcp --dport 22 -j ACCEPT
# snmp
-A INPUT -p udp --dport 161 -j ACCEPT
# Cockpit
-A INPUT -p tcp --dport 9090 -j ACCEPT
-A INPUT -p tcp -m tcp --dport 5432 -j ACCEPT
-A INPUT -p tcp -m tcp --dport 443 -j ACCEPT
-A INPUT -p udp -m udp --dport 7410 -j ACCEPT
-A INPUT -p tcp -m tcp --dport 54323 -j ACCEPT
-A INPUT -p tcp -m tcp --dport 54322 -j ACCEPT
-A INPUT -p tcp -m tcp --dport 6100 -j ACCEPT
-A INPUT -p tcp -m tcp --dport 662 -j ACCEPT
-A INPUT -p udp -m udp --dport 662 -j ACCEPT
-A INPUT -p tcp -m tcp --dport 875 -j ACCEPT
-A INPUT -p udp -m udp --dport 875 -j ACCEPT
-A INPUT -p tcp -m tcp --dport 892 -j ACCEPT
-A INPUT -p udp -m udp --dport 892 -j ACCEPT
-A INPUT -p tcp -m tcp --dport 2049  -j ACCEPT
-A INPUT -p udp -m udp --dport 32769 -j ACCEPT
-A INPUT -p tcp -m tcp --dport 32803 -j ACCEPT
-A INPUT -p tcp -m tcp --dport 80 -j ACCEPT
-A INPUT -p tcp -m tcp --dport 2222 -j ACCEPT
-A INPUT -p tcp --dport 16514 -j ACCEPT
-A INPUT -p tcp -m multiport --dports 2223 -j ACCEPT
-A INPUT -p tcp -m multiport --dports 5900:6923 -j ACCEPT
-A INPUT -p tcp -m multiport --dports 49152:49216 -j ACCEPT
-A INPUT -p udp --dport 6081 -j ACCEPT
-A OUTPUT -p udp --dport 6081 -j ACCEPT
-A INPUT -j REJECT --reject-with icmp-host-prohibited
-A FORWARD -m physdev ! --physdev-is-bridged -j REJECT --reject-with icmp-host-prohibited
COMMIT
Step 7. Reload iptables
[root@engine1 ~]# systemctl reload iptables
Step 8. Run Engine Setup (For the firewall choose NO as we already configured it)
[root@engine1 ~]# engine-setup
Step 9. That step is fairly quick once done login as admin

Step 10. Go to the hosts tab and click new (fill out the fields then hit ok
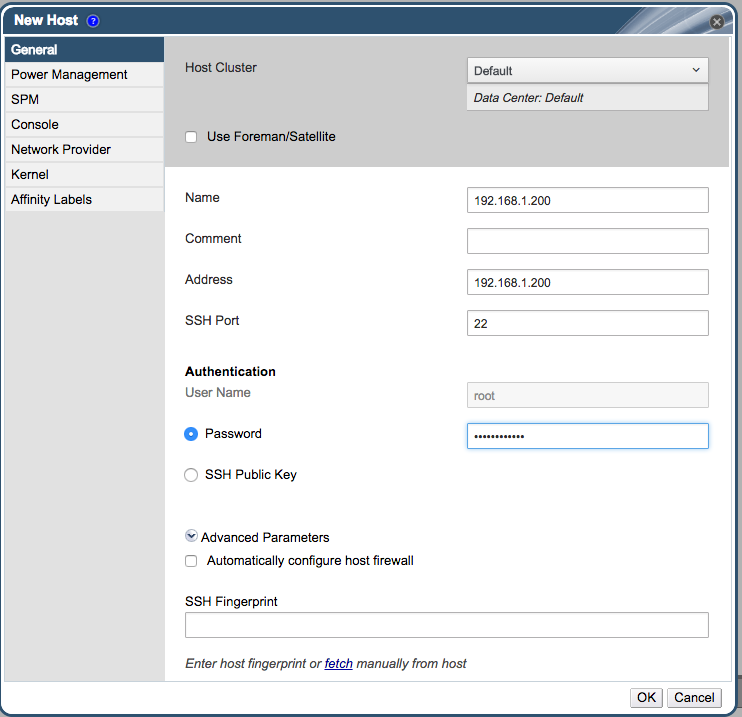
Make sure you uncheck the button “Automatically configure host firewall”
Step 11. Once your host is activated you should see this.

Step 12. Put the host into maintenance mode to define where you local storage will be. (keep in mind that it probably will make a lot of sense to have a separate Raid disk for the data domain) You will also have to add it to fstab
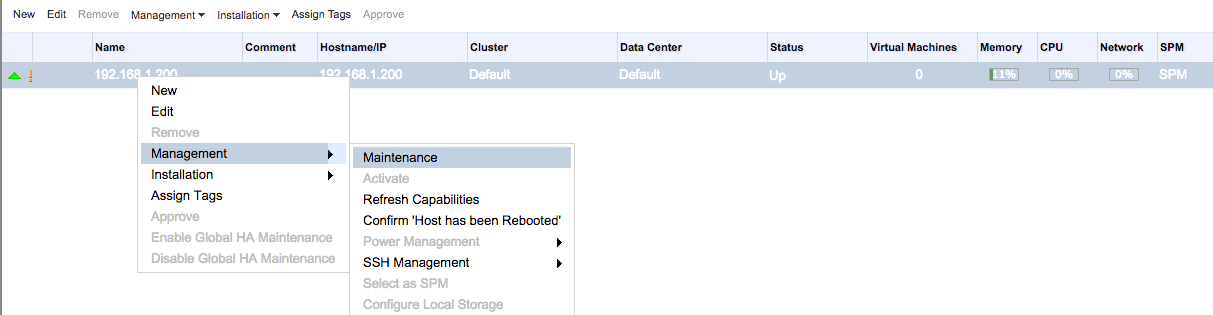
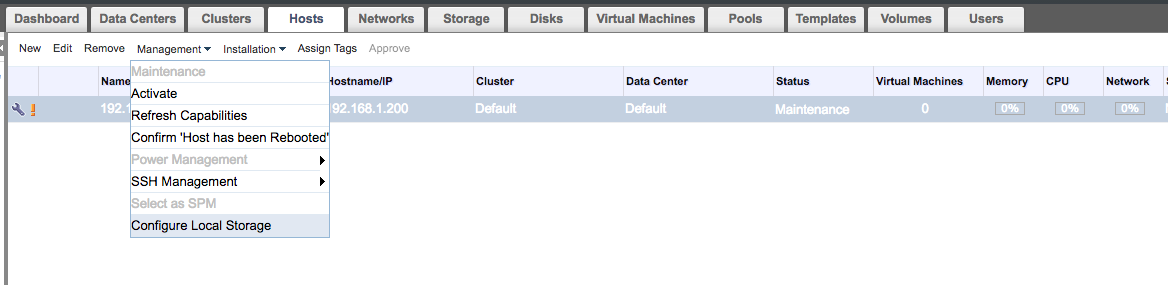
Step 12. Once the node is in maintenance mode click on Management -> Configure local storage

Step 14. Configure the path for the local storage.
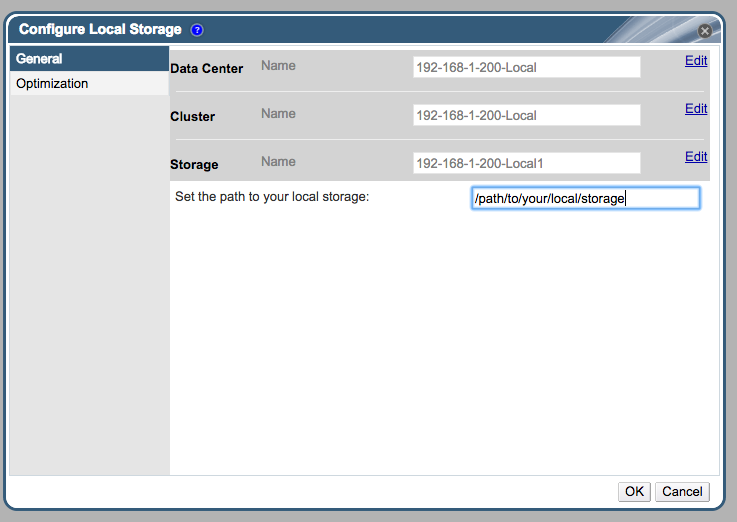
Step 15. Make sure that the directory you specify above is owned by vdsm.kvm. After you added the path hit ok. It will create the storage domain.

Step 16. You are now ready to use RHV.