This post is going to walk you through a full HA Network isolated Red Hat OpenStack installation with 3 Controllers, 3 Compute and 3 Ceph OSD nodes in only 16 simple steps.
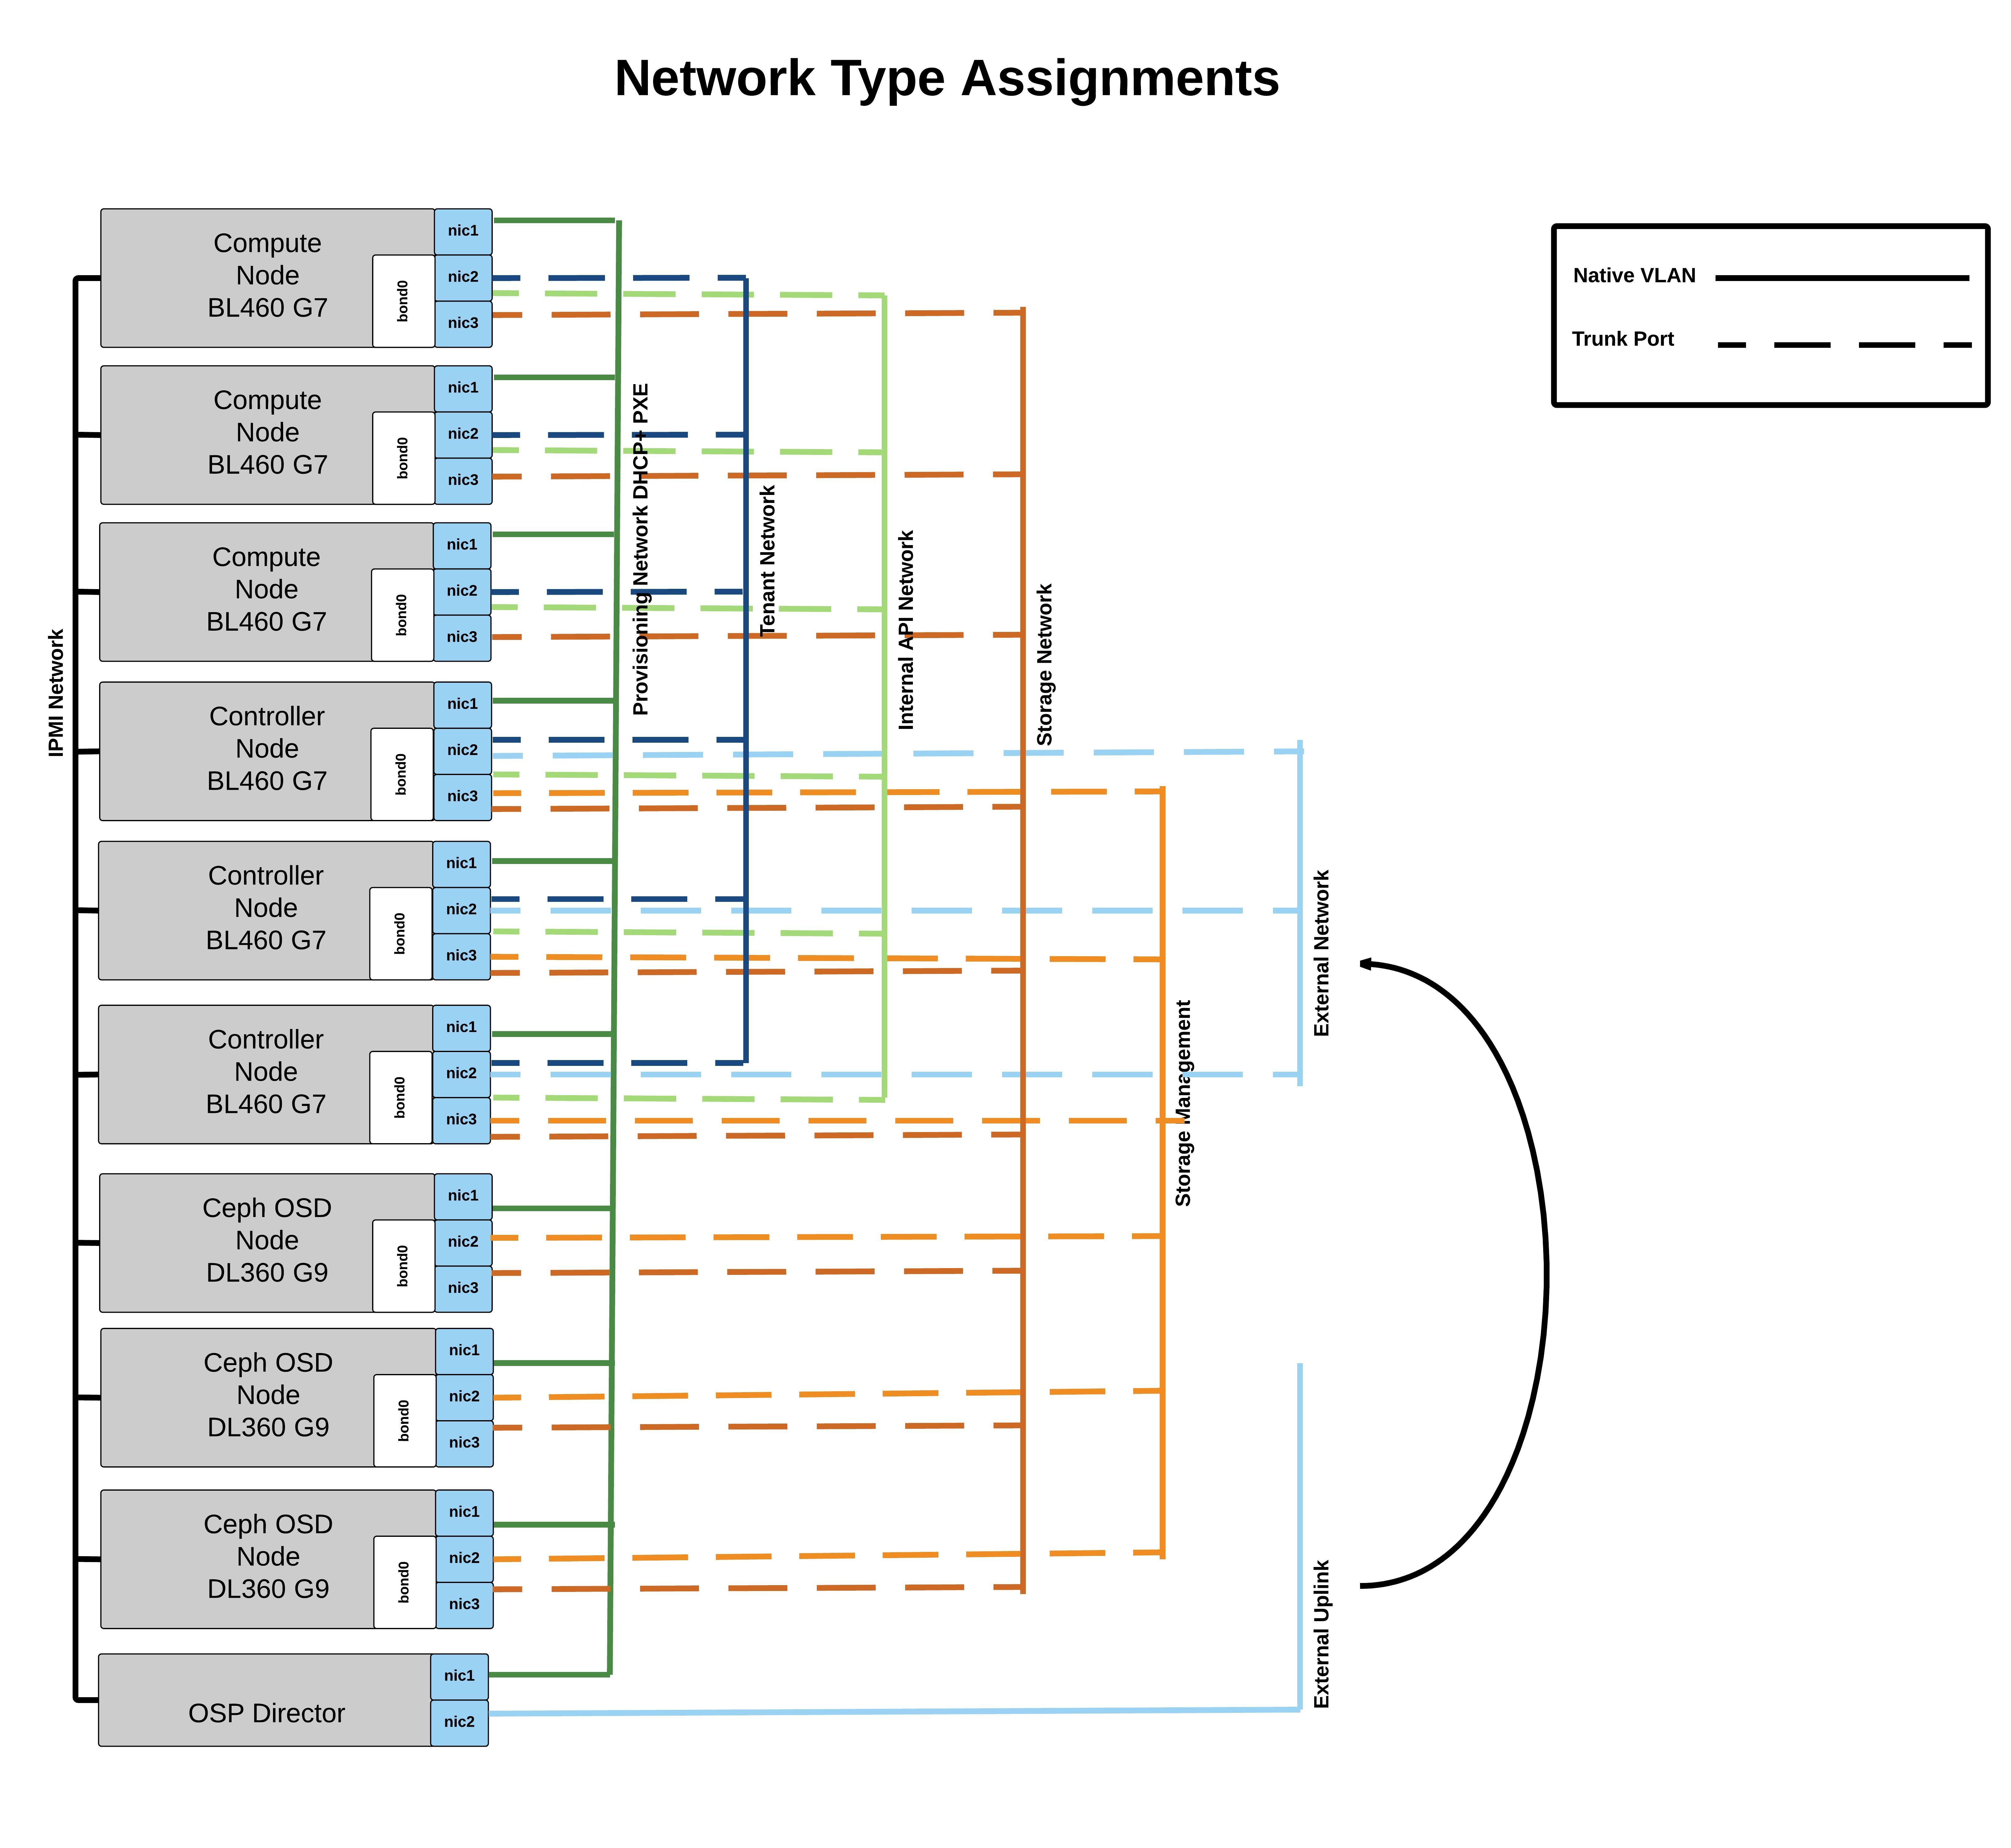
To be successful with this deployment you will have to follow this network diagram (create the trunks and vlans on the switch) and work with OSP Director 7.1. Working NTP and IPMI access (from director and controllers) is critical for this environment:
Ok lets start the installation. All scripts you are going to run are a collection of the steps described in the Red Hat documentation. The scripts can be found here: ospdirectorinstall
Step 1 I assume that you already have a RHEL 7.1 installation. Download the following script.
ospdirectorinstall.sh
https://raw.githubusercontent.com/ldomb/ospdirectorinstaller/master/ospdirectorinstall.sh
[root@directorv ~]# wget https://raw.githubusercontent.com/ldomb/ospdirectorinstaller/master/ospdirectorinstall.sh
Step 2 Once downloaded fill out the variables RHNUSER to UNDERCLOUD_DEBUG_BOOL. Note I set DISCOVERY_RUNBENCH_BOOL=false. If you are in a PROD environment this is not recommended as it disables the gathering of host metrics during introspection.
Step 3 Run the script to prepare for the actual undercloud/director software and follow the commands which the script tells you to execute.
[root@directorv ~]# chmod +x ospdirectorinstall.sh
[root@directorv ~]# ./ospdirectorinstall.sh
"Launch the following command as user STACK!"
[root@directorv ~]# "su - stack"
[stack@ospdirector ~]$ "screen"
[stack@ospdirector ~]$ "export HOSTNAME=directorv.local.domb.com && openstack undercloud install"
"CTRL a d"
Step 4 Download the Red Hat images Deployment Ramdisk for RHEL-OSP director 7.1 , Discovery Ramdisk for RHEL-OSP director 7.1, Overcloud Image for RHEL-OSP director 7.1 and place them in the image folder. You can find those images here:
OSP Images
[stack@ospdirector ~]$ ls ~/images
deploy-ramdisk-ironic-7.1.0-39.tar
discovery-ramdisk-7.1.0-39.tar
overcloud-full-7.1.0-39.tar
[stack@ospdirector ~]$ for tarfile in *.tar; do tar -xf $tarfile; done
[stack@ospdirector ~]$ openstack overcloud image upload --image-path /home/stack/images/
Step 5 Download all the scripts you’ll need for this install
[stack@ospdirector ~]$ wget --no-check-certificate https://raw.githubusercontent.com/ldomb/ospdirectorinstaller/master/get_all_files.sh && sh /home/stack/get_all_files.sh
Step 6 Create the flavor compute, controller, ceph-storage and baremetal
[stack@ospdirector ~]$ ./2_createflavors.sh
Step 7 Add DNS for the overcloud nodes (You will have to edit your own DNS in neutrondns.sh)
[stack@ospdirector ~]$ ./3_neutrondns.sh
Step 8 Create your instackenv.json file and start introspection. Remember to choose the correct ipmi_type
Please edit the 5_registernodes.sh and add your macaddress,ipmi url,ipmi user, ipmi password, ipmi tool. I am using Joe talerico python script https://github.com/jtaleric/csv-to-instack to create the instackenv.json files.
[stack@ospdirector ~]$ ./5_registernodes.sh
Step 9 Assign nodes to their profiles. If you used benchmark equals true you can also run the ahc-match instead of assigning the hosts manually.
AHC-TOOLS
[stack@directorv ~]$ ironic node-list
+--------------------------------------+------+---------------+-------------+-----------------+-------------+
| UUID                                 | Name | Instance UUID | Power State | Provision State | Maintenance |
+--------------------------------------+------+---------------+-------------+-----------------+-------------+
| e84d978c-623f-435f-942a-cd3c6c9b62b0 | None | None          | power off   | available       | False       |
| 2224df90-c27f-4909-8c2b-c6268b3db820 | None | None          | power off   | available       | False       |
| a4bd7695-455b-4f42-b206-191e0794783a | None | None          | power off   | available       | False       |
| 7dce653c-468a-44c4-9093-b0411776cff5 | None | None          | power off   | available       | False       |
| 913b2ba6-78dc-4a6f-8dc7-08aff46eb3f6 | None | None          | power off   | available       | False       |
| d230af02-4c04-4a82-9956-60a7603693bf | None | None          | power off   | available       | False       |
| 97fc280d-3f84-41ca-a779-a4548fd3779d | None | None          | power off   | available       | False       |
| 47e88345-f875-47ed-9c8c-bb01581c597e | None | None          | power off   | available       | False       |
| 312d4651-6d21-47f0-b137-a31612db9786 | None | None          | power off   | available       | False       |
+--------------------------------------+------+---------------+-------------+-----------------+-------------+

+--------------------------------------+------+--------------------------------------+-------------+-----------------+-------------+
[stack@ospdirector ~]$ ironic node-update e84d978c-623f-435f-942a-cd3c6c9b62b0 add properties/capabilities='profile:control,boot_option:local'
[stack@ospdirector ~]$ ironic node-update 2224df90-c27f-4909-8c2b-c6268b3db820 add properties/capabilities='profile:control,boot_option:local'
[stack@ospdirector ~]$ ironic node-update a4bd7695-455b-4f42-b206-191e0794783a add properties/capabilities='profile:control,boot_option:local'
[stack@ospdirector ~]$ ironic node-update 7dce653c-468a-44c4-9093-b0411776cff5 add properties/capabilities='profile:compute,boot_option:local'
[stack@ospdirector ~]$ ironic node-update 913b2ba6-78dc-4a6f-8dc7-08aff46eb3f6 add properties/capabilities='profile:compute,boot_option:local'
[stack@ospdirector ~]$ ironic node-update d230af02-4c04-4a82-9956-60a7603693bf add properties/capabilities='profile:compute,boot_option:local'
[stack@ospdirector ~]$ ironic node-update 97fc280d-3f84-41ca-a779-a4548fd3779d add properties/capabilities='profile:ceph-storage,boot_option:local'
[stack@ospdirector ~]$ ironic node-update 47e88345-f875-47ed-9c8c-bb01581c597e add properties/capabilities='profile:ceph-storage,boot_option:local'
[stack@ospdirector ~]$ ironic node-update 312d4651-6d21-47f0-b137-a31612db9786 add properties/capabilities='profile:ceph-storage,boot_option:local'
Step 10 Copy the Director template files from /usr/share/openstack-tripleo-heat-templates/ into your /home/stack/templates/ folder
[stack@ospdirector ~]$ cp -r /usr/share/openstack-tripleo-heat-templates/* /home/stack/templates/
[stack@ospdirector ~]$ cp -r /usr/share/openstack-tripleo-heat-templates/network/config/bond-with-vlans/* /home/stack/templates/nic-configs/
Step 11 Create the network-environment.yaml file so it maps to your environment. If you do not use lacp remove the bonding option as it might cause problem.
[stack@ospdirector ~]$ vi /home/stack/templates/network-environment.yaml
# Enable the creation of Neutron networks for isolated Overcloud
# traffic and configure each role to assign ports (related
# to that role) on these networks.
resource_registry:
  # Network Interface templates to use (these files must exist)
  OS::TripleO::BlockStorage::Net::SoftwareConfig: /home/stack/templates/nic-configs/cinder-storage.yaml
  OS::TripleO::Compute::Net::SoftwareConfig: /home/stack/templates/nic-configs/compute.yaml
  OS::TripleO::Controller::Net::SoftwareConfig: /home/stack/templates/nic-configs/controller.yaml
  OS::TripleO::ObjectStorage::Net::SoftwareConfig: /home/stack/templates/nic-configs/swift-storage.yaml
  OS::TripleO::CephStorage::Net::SoftwareConfig: /home/stack/templates/nic-configs/ceph-storage.yaml

parameter_defaults:
  # This section is where deployment-specific configuration is done
  # Customize the IP subnets to match the local environment
  InternalApiNetCidr: 192.168.20.0/24
  StorageNetCidr: 192.168.203.0/24
  StorageMgmtNetCidr: 192.168.11.0/24
  TenantNetCidr: 192.168.30.0/24
  ExternalNetCidr: 192.168.10.0/24
  ExternalInterfaceDefaultRoute: 192.168.10.1
  # CIDR subnet mask length for provisioning network
  #ControlPlaneSubnetCidr: '24'
  # Customize the IP ranges on each network to use for static IPs and VIPs
  InternalApiAllocationPools: [{'start': '192.168.20.10', 'end': '192.168.20.200'}]
  StorageAllocationPools: [{'start': '192.168.203.10', 'end': '192.168.203.200'}]
  StorageMgmtAllocationPools: [{'start': '192.168.11.10', 'end': '192.168.11.200'}]
  TenantAllocationPools: [{'start': '192.168.30.10', 'end': '192.168.30.200'}]
  # Leave room if the external network will also be used for floating IPs
  ExternalAllocationPools: [{'start': '192.168.10.10', 'end': '192.168.10.50'}]
  # Gateway router for the provisioning network (or Undercloud IP)
  ControlPlaneDefaultRoute: 192.168.2.2
  # Generally the IP of the Undercloud
  EC2MetadataIp: 192.168.2.2
  # Define the DNS servers (maximum 2) for the overcloud nodes
  DnsServers: ["8.8.8.8","8.8.4.4"]
  # Customize the VLAN IDs to match the local environment
  InternalApiNetworkVlanID: 20
  StorageNetworkVlanID: 203
  StorageMgmtNetworkVlanID: 11
  TenantNetworkVlanID: 30
  ExternalNetworkVlanID: 10
  # Set to empty string to enable multiple external networks or VLANs
  NeutronExternalNetworkBridge: "''"
  # Customize bonding options
  BondInterfaceOvsOptions:
      "bond_mode=balance-tcp lacp=active other-config:lacp-fallback-ab=true"
  NeutronNetworkVLANRanges: [10]
Step 12 Now we download the files fix_rabbit.yaml, limits.yaml, ceph-environment.yaml firstboot-environment.yaml , ceph_wipe.yaml (edit this files so it reflects your disk setup) and place them in the templates and firstboot folder (we are doing some maintenance on first boot. Set the root password of the instances in the firstboot-environment.yaml if you like. The default will be redhat.
[stack@ospdirector ~]$ ./7_getyamls.sh
Step 13 Make the necessary changes to /home/stack/templates/puppet/hieradata/ceph.yaml. In my case the journal is on the osd. Thats why the journal is blank.
ceph::profile::params::osd_journal_size: 1024
ceph::profile::params::osd_pool_default_pg_num: 128
ceph::profile::params::osd_pool_default_pgp_num: 128
ceph::profile::params::osd_pool_default_size: 3
ceph::profile::params::osd_pool_default_min_size: 1
ceph::profile::params::osds:
     '/dev/sdb': {}
ceph::profile::params::manage_repo: false
ceph::profile::params::authentication_type: cephx

ceph_pools:
  - volumes
  - vms
  - images
If you want to have the journals on a separate partition your can exchange the ceph::profile::params::osds: with
ceph::profile::params::osds:
  '/dev/sdb1':
  journal: '/dev/sdb2'
  '/dev/sdc1':
  journal: '/dev/sdc2'
Step 14 Go ahead and launch the install.
[stack@ospdirector ~]$ openstack overcloud deploy --templates \
-e /usr/share/openstack-tripleo-heat-templates/environments/network-isolation.yaml \
-e /home/stack/templates/environments/storage-environment.yaml \
-e /home/stack/templates/network-environment.yaml \
-e /home/stack/templates/limits.yaml \
-e /home/stack/templates/ceph-environment.yaml \
-e /home/stack/templates/firstboot-environment.yaml \
--control-flavor control \
--compute-flavor compute \
--ceph-storage-flavor ceph-storage \
--control-scale 3 \
--compute-scale 3 \
--ceph-storage-scale 3 \
--ntp-server time.nist.gov \
--neutron-tunnel-types vxlan \
--neutron-network-type vxlan \
Step 15 As a postinstall task you could enable fencing for the PCS cluster nodes. Repeat this for each cluster/controller node:
[heat-admin@overcloud-controller-0 ~]$ sudo pcs stonith create my-ipmilan-for-controller01 fence_ipmilan pcmk_host_list=overcloud-controller-0 ipaddr=192.168.1.6 login=admin passwd=directoriscool lanplus=1 cipher=1 op monitor interval=60s
$ sudo pcs constraint location my-ipmilan-for-controller01 avoids overcloud-controller-0
Step 16 Once done enable fencing
[heat-admin@overcloud-controller-0 ~]$ sudo pcs property set stonith-enabled=true
Enjoy your Full HA 9 node environment.