Ever wondered what CloudForms can do for you in AWS? The next few blog posts will walk you through step by step how to upload the CloudForms image to AWS, how to assign the correct policies and roles and how to configure it correctly so it can discover your environment. Part 1 is dedicated to the import and configuration of the CloudForms image.
With the release of CloudForms 4.6 you also have the ability to scan instances in AWS. These blog series will show you how this can be achieved:
First, go to the AWS console and launch a free tier amazon AMI. We are doing this because it already has the aws cli tools installed. 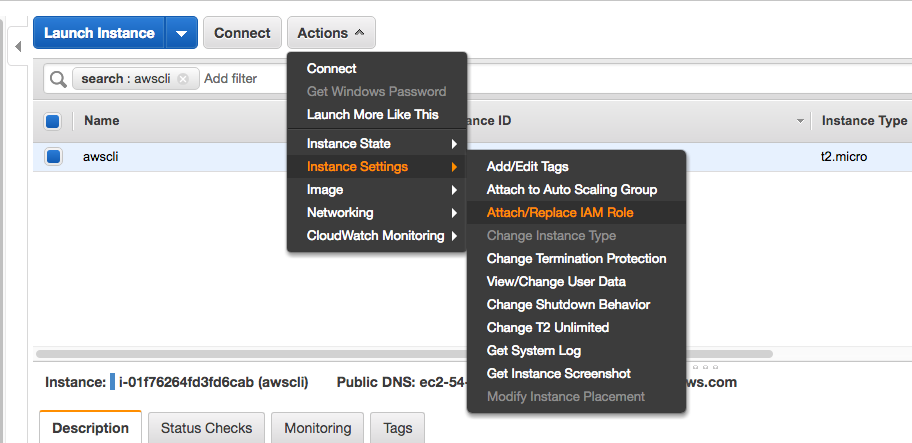
In the ec2 web console attach the admin IAM role for this instance (you can delete the instance after setup)
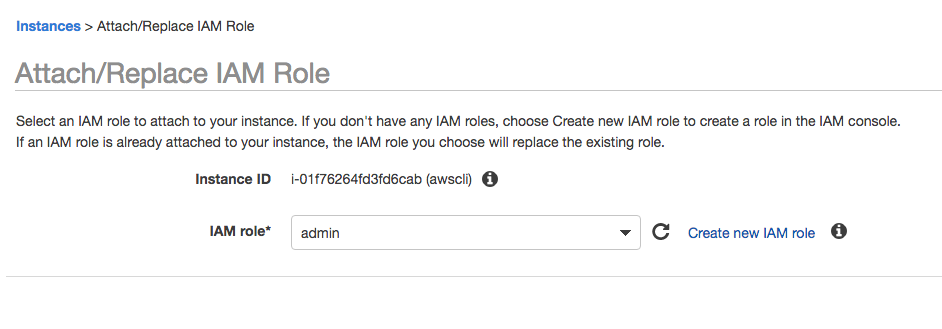
This will open the following window.
Assign the admin role and apply.
Your instance should be up by now. Go and ssh into it (don’t worry my private key was a one time key).
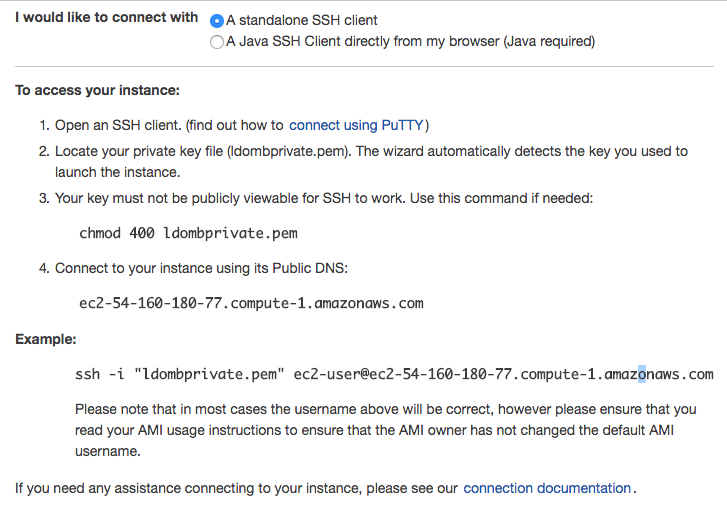
ssh -i "ldombprivate.pem" ec2-user@ec2-54-160-180-77.compute-1.amazonaws.com
The next step will be to configure the cli for the correct region. As we assigned an IAM role you won’t need to add any credentials.
[ec2-user@ip-172-31-14-85 ~]$ aws configure

AWS Access Key ID [None]:

AWS Secret Access Key [None]:

Default region name [None]: us-east-1

Default output format [None]:
Login into the Red Hat Portal and get the Amazon VHD
wget "https://access.cdn.redhat.com//content/origin/files/sha256/18/18d7f11b2163f4cd894f4683394d9723102342a73212c68e97461469788b72e9/cfme-ec2-5.9.0.22-1.x86_64.vhd?_auth_=1520802709_a5f94e34e15f6b286e4a129392c06c44" -O cfme-ec2-5.9.0.22-1.x86_64.vhd
The next step is to create an S3 bucket where we can upload the VHD to later be converted into an ami
[ec2-user@ip-172-31-14-85 ~]$ aws s3 mb s3://awscfme59
Before we copy any file it’s important to understand that S3 does not have a private endpoint. Thus you would copy the vhd via the internet. If you want to speed things up you can go to your VPC and create an s3 endpoint. This will speed up the upload of the VHD to the s3 bucket.
Lets copy the cfme-ec2-5.9.0.22-1.x86_64.vhd to the s3 bucket. If you enabled the endpoint you should see speeds like the following:

Once completed you will see the following:
[ec2-user@ip-172-31-14-85 ~]$ aws s3 cp cfme-ec2-5.9.0.22-1.x86_64.vhd s3://awscfme59/

upload: ./cfme-ec2-5.9.0.22-1.x86_64.vhd to s3://awscfme59/cfme-ec2-5.9.0.22-1.x86_64.vhd
If you have never imported a VM in aws you will need to add the following VM import trust policy. Create a file named vm-import.json with the following content:
{
  "Version": "2012-10-17",
  "Statement": [
     {
        "Effect": "Allow",
        "Principal": { "Service": "vmie.amazonaws.com" },
        "Action": "sts:AssumeRole",
        "Condition": {
           "StringEquals":{
              "sts:Externalid": "vmimport"
           }
        }
     }
  ]
}
Go ahead and create the trust policy for the role vmimport:
[ec2-user@ip-172-31-16-233 ~]$ aws iam create-role --role-name vmimport --assume-role-policy-document file://vm-import.json

{

   "Role": {
       "AssumeRolePolicyDocument": {
           "Version": "2012-10-17",
           "Statement": [
               {
                   "Action": "sts:AssumeRole",
                   "Effect": "Allow",
                   "Condition": {
                       "StringEquals": {
                           "sts:Externalid": "vmimport"
                       }
                   },
                   "Principal": {
                       "Service": "vmie.amazonaws.com"
                   }
               }
           ]
       },
       "RoleId": "AROAJZLT6IXHOKY3S4OE2",
       "CreateDate": "2018-03-09T22:46:31.581Z",
       "RoleName": "vmimport",
       "Path": "/",
       "Arn": "arn:aws:iam::XXXXXXXXX:role/vmimport"
   }
}
Next, we will need to add the role policy to allow s3 to list the buckets as well as create the snapshot, convert and register the CloudForms ami AMI. Create a file named role-policy.json
{
  "Version":"2012-10-17",
  "Statement":[
     {
        "Effect":"Allow",
        "Action":[
           "s3:GetBucketLocation",
           "s3:GetObject",
           "s3:ListBucket"
        ],
        "Resource":[
           "arn:aws:s3:::awscfme59",
           "arn:aws:s3:::awscfme59/*"
        ]
     },
     {

        "Effect":"Allow",
        "Action":[
           "ec2:ModifySnapshotAttribute",
           "ec2:CopySnapshot",
           "ec2:RegisterImage",
           "ec2:Describe*"
        ],
        "Resource":"*"
     }
  ]
}
Create the role policy for vmimport
[ec2-user@ip-172-31-16-233 ~]$ aws iam put-role-policy --role-name vmimport --policy-name vmimport --policy-document file://role-policy.json
Before we can import the file we need to create one last file named container.json
[
 {
 "Description": "cfme5922",
 "Format": "vhd",
 "UserBucket": {
       "S3Bucket": "awscfme59",
"S3Key": "cfme-ec2-5.9.0.22-1.x86_64.vhd"
     }
 }
]
Import CloudForms into your aws account.
[ec2-user@ip-172-31-16-233 ~]$ aws ec2 import-image --description "CFME 5.9.0.22" --disk-containers file://container.json --region us-east-1
{
   "Status": "active",
   "Description": "CFME 5.9.0.22",
   "SnapshotDetails": [
       {
           "UserBucket": {
               "S3Bucket": "awscfme59",
               "S3Key": "cfme-ec2-5.9.0.22-1.x86_64.vhd"
           },
           "DiskImageSize": 0.0,
           "Format": "VHD"
       }
   ],
   "Progress": "2",
   "StatusMessage": "pending",
   "ImportTaskId": "import-ami-ffut8pit"
}
The StatusMessage will go from pending to converting to updating, booting, preparing ami.
You can view the status by executing the following command.
[ec2-user@ip-172-31-16-233 ~]$ aws ec2 describe-import-image-tasks --import-task-ids import-ami-ffut8pit
{
   "ImportImageTasks": [
       {
           "Status": "active",
           "LicenseType": "BYOL",
           "Description": "CFME 5.9.0.22",
           "Platform": "Linux",
           "Architecture": "x86_64",
           "SnapshotDetails": [
               {
                   "DeviceName": "/dev/sda1",
                   "Description": "cfme5922",
                   "Format": "VHD",
                   "DiskImageSize": 3071064576.0,
                   "SnapshotId": "snap-0d03e300d77484906",
                   "UserBucket": {
                       "S3Bucket": "awscfme59",
                       "S3Key": "cfme-ec2-5.9.0.22-1.x86_64.vhd"
                   }
               }
           ],
           "Progress": "85",
           "StatusMessage": "preparing ami",
           "ImportTaskId": "import-ami-ffut8pit
"
       }
   ]
}
When the task import is finished you will see the field “ImageId“: “ami-140fc869”, in the task output.
[ec2-user@ip-172-31-14-85 ~]$ aws ec2 describe-import-image-tasks --import-task-ids import-ami-ffut8pit
{
    "ImportImageTasks": [
        {
            "Status": "completed",
            "LicenseType": "BYOL",
            "Description": "CFME 5.9.0.22",
            "ImageId": "ami-140fc869",
            "Platform": "Linux",
            "Architecture": "x86_64",
            "SnapshotDetails": [
                {
                    "DeviceName": "/dev/sda1",
                    "Description": "cfme5922",
                    "Format": "VHD",
                    "DiskImageSize": 3071064576.0,
                    "SnapshotId": "snap-099c934a3bfe52a16",
                    "UserBucket": {
                        "S3Bucket": "awscfme59",
                        "S3Key": "cfme-ec2-5.9.0.22-1.x86_64.vhd"
                    }
                }
            ],
            "ImportTaskId": "import-ami-ffut8pit"
        }
    ]
}
The ami will have a cryptic name which is not very readable. So let’s change the name
[ec2-user@ip-172-31-14-85 ~]$ aws ec2 copy-image --source-image-id ami-140fc869 --source-region us-east-1 --region us-east-1 --name "cfme_5922"
{
    "ImageId": "ami-ec04c391"
}
Let’s go an cleanup so we don’t have to pay for aws resources we don’t need.
[ec2-user@ip-172-31-16-233 ~]$ aws ec2 deregister-image --image-id ami-140fc869
You can also delete the file we uploaded to s3 to save costs
[ec2-user@ip-172-31-16-233 ~]$ aws s3 rm s3://awscfme59/cfme-ec2-5.9.0.22-1.x86_64.vhd

 delete: s3://awscfme59/cfme-ec2-5.9.0.22-1.x86_64.vhd
And remove the bucket as well
[ec2-user@ip-172-31-16-233 ~]$ aws s3 rb s3://awscfme59 --force

remove_bucket: awscfme59
Go back to your aws console and click on my AMI. You should now see your new CloudForms AMI ready to launch.

Once the ami is done copying you will see the status to available. You are now ready to launch the CFME instance. For instance type choose t2.xlarge. Please follow the installation guide for the initial setup once the appliance is imported. The next post will explain how to add the AWS provider correctly and what roles and aws service will need to be enabled for a Smart state analysis to work.