Part 2 of the post series is going to walk you through how to build your ceph cluster after you performed the initial configuration for ceph.
NOTE: Ceph 1.2.3 fails to install the Diamond package on minion nodes during state.highstate. You can find the bug report and fix here Diamond bug . Thanks to my co worker James for pointing that out.
1. We can now go ahead and create the cluster configurations. It is critical that all commands will be run from that folder to get a successful installation.
[root@ceph-mgmt ~]# cd ~/ceph-config
2. Deploy the ceph monitors
[root@ceph-mgmt ~]# ceph-deploy new ceph-mon01 ceph-mon02 ceph-mon03
3. As your ceph-mgmt node will be the admin node we need ceph and ceph-common installed
[root@ceph-mgmt ~]# yum -y install ceph ceph-common
4. Next we can install the ceph software on the nodes. Make sure you followed the initial installation of part 1!
[root@ceph-mgmt ~]# ceph-deploy -v install ceph-mgmt ceph-mon01 ceph-mon02 ceph-mon03 ceph-osd01 ceph-osd02 ceph-osd03 ceph-osd4 ceph-osd05
5. We now need to add the initial monitors and gather the keys. This will place the keys into your ceph-deploy directory.
[root@ceph-mgmt ~]# ceph-deploy mon create-initial
6. As we installed all the nodes and initialized the monitors we can connect them to calamari. Your ceph cluster will still be in an error state as you need at least 3 active osd to get the cluster into a healthy state.
[root@ceph-mgmt ~]# ceph-deploy -v calamari connect ceph-mgmt ceph-mon01 ceph-mon02 ceph-mon03 ceph-osd01 ceph-osd02 ceph-osd03 ceph-osd04 ceph-osd05
7. Define the ceph-mgmt node as admin node
[root@ceph-mgmt ~]# ceph-deploy admin ceph-mgmt ceph-mon01 ceph-mon02 ceph-mon03 ceph-osd01 ceph-osd02 ceph-osd03 ceph-osd04 ceph-osd05
8. Prepare the disks and add the osd’s to the cluster. As I do not have SSD for a cache pool the journals will reside on the OSD’s which is not optimal from a performance point of view but enough for a poc setup. It is recommended to “dd” out your osd disks before you run the next stage. This step can run for a while depending on the amount of disks you will add to the cluster (It is not necessary to partition your disks as the “–zap” option will do that for you).
[root@ceph-mgmt ~]# for i in osd01 osd02 osd03 osd04 osd05; do
ceph-deploy -v osd create ceph-$i:sdb --zap
ceph-deploy -v osd create ceph-$i:sdc --zap
ceph-deploy -v osd create ceph-$i:sdd --zap
ceph-deploy -v osd create ceph-$i:sde --zap
ceph-deploy -v osd create ceph-$i:sdf --zap
ceph-deploy -v osd create ceph-$i:sdg --zap
ceph-deploy -v osd create ceph-$i:sdh --zap
ceph-deploy -v osd create ceph-$i:sdi --zap
ceph-deploy -v osd create ceph-$i:sdj --zap
.........
.........
.........
.........;
done
9. After all your OSD are added successfully to your cluster you should be able to run the following command
[root@ceph-mgmt ~]# ceph -s
    cluster cfdf7859-08a5-4fe4-9942-e19c6b522945
     health HEALTH_OK
     monmap e1: 3 mons at {ceph-mon01=172.16.200.231:6789/0,ceph-mon02=172.16.200.242:6789/0,ceph-mon03=172.16.200.238:6789/0}, election epoch 10, quorum 0,1,2 ceph-mon01,ceph-mon03,ceph-mon02
     osdmap e513: 115 osds: 115 up, 115 in
      pgmap v7615: 13312 pgs, 4 pools, 2780 MB data, 641 objects
            15632 MB used, 53349 GB / 53365 GB avail
               13312 active+clean
or login into calamari and see an active healthy cluster.
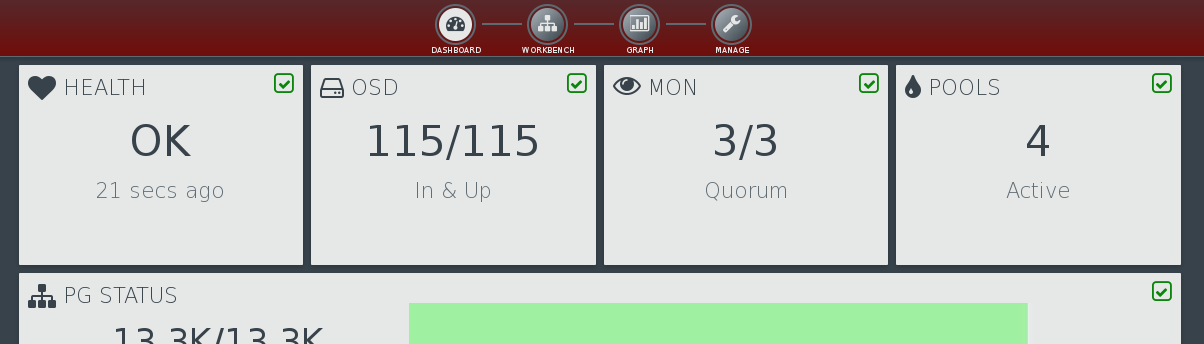
Congratulations you have now a running ceph cluster!